The art of coding

Today I spent few hours in my favourite London museum: The Design Museum.
I went to the main exhibition called Designer, Maker, User where they created a journey between these 3 actors explaining how they are linked together and all the innovations they brought up in the past 100 years in different industries like transportation, fashion, design and so on.

During the time spent in the museum I was able to create a parallelism between the exhibition topic and the software world.
I truly believe that we are creating some sort of art when we write code, if you want in an hidden way because our users can appreciate just the “visual” result more the journey behind it but in a certain way it’s what we are evaluating when we look at a statue or a painting right?

Communication

At the beginning of this journey there was a sign with the topic explanation:

Design is a process carried out by people, for people.
At its heart is a dialogue between three key people: the designer, the maker and the user.
[…] The exhibition shows how designers respond to the needs of makers and users, how users consume and influence design and how revolutions in technology and manufacturing transform our world

Does it sound familiar? Have you ever thought how many times we are executing this process on a daily basis in our job?
All the innovations we went trough in the past few years moving from procedural programming to functional programming, from MVC to Reactive architectures, from Monolith to Microservices architectures?

Have you ever realised how important is the feedback loop (dialogue between designer, maker and user) in our job too?
A feedback loop that is partially hidden behind techniques like unit testing, TDD, continuous integration or continuous delivery.
I saw several times in my career people integrating or using these techniques without understanding why they should do it.
The feedback loop is a well known technique in many Agile and Lean frameworks and you can learn about ita lot from different talks and books.
If you are curious how to improve it I’d suggest to start reading a book on Kaizen, you will discover the feedback loop as cornerstone for your continuous improvement journey.

Simplicity

Few steps later, I found a couple of subway maps: the first London Tube Map and the New York subway map.

the first Tube Map

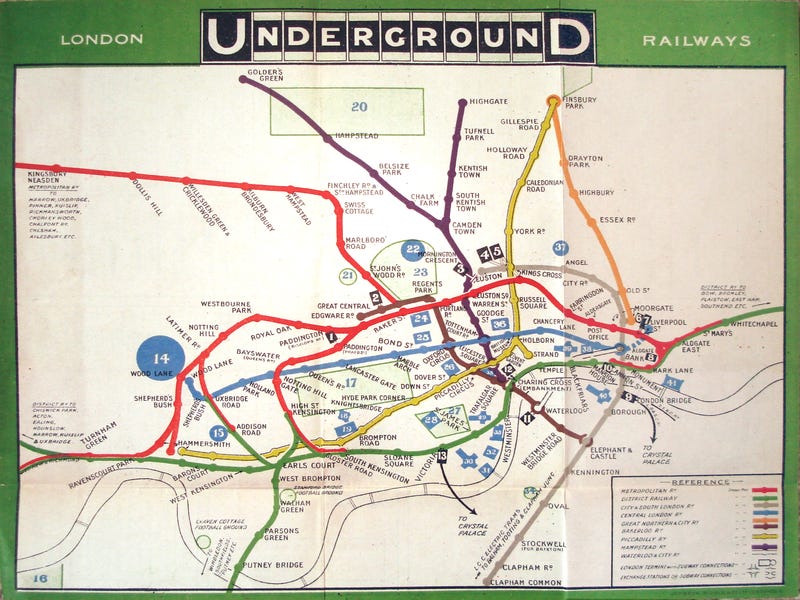
Both were created around 70s with the main intent of simplify how to travel across the city.
Independently that these maps distort the reality not providing a perfect representation of the city, they become the standard for travelling for millions of users from all over the world.

The takeaway here is the simplicity: simplicity in our code, simplicity in our tests, simplicity in our architectures, simplicity in our daily tasks.

A technique that I learnt during my career is no matter how complex is a specific task or implementation, it can always be divided in smaller chunks of work and when you reach the smallest one, then you can start working on it.
This approach will give you 2 main benefits:

  1. you are defining a list of steps to follow in order to create a more complex algorithm, therefore you are already thinking how to achieve the final solution in a systematic way.
    I’d suggest you to write down the list of things to do so you can visually see what you need to achieve (what is not visualised, doesn’t exist)
  2. if you have a list of small tasks that you can achieve in minutes instead of hours your self awareness will grow minute by minute and at the end of the day you will see many things achieved instead “just a few” big tasks.

Modularisation

Another interesting video that I watched in the museum was related to the design of new Tube trains available in the future.
In this case the main goal for the designers would be increasing the frequency and the capacity of each line maintaining the same infrastructure.

new London Tube train

A part from the current infrastructure (tunnel size for instance) the designers need to take in consideration how often these trains will be replaced.
In fact each train will remain in use for 30–40 years and you can understand how many innovations and improvements the humans can do in this large amount of time.
So they approached the problem taking in consideration the 2 big constrains (time and infrastructure) and they designed a larger train optimising every single centimetre inside each coach, creating bigger entrances for speeding up the access inside the coach but, more importantly, for accommodating the future innovations that could improve their trains, they have created modular part inside each coach that could be removed and exchange with something better in the future.

That approach completely blew my mind, the modularisation of applications is a problem solved in many ways inside the software world.
Encouraging loosely coupled relations over tight coupled ones, is a cornerstone in all the main frameworks.
Think for a moment about the frontend framework evolution where, after React release, they moved all to a more component-oriented architecture.

Think then to all the design patterns that are encouraging decoupling objects since the beginning of the software history… it’s incredible how easily we can retrieve these important concepts of software engineering in the real world.

If we want to take a similar approach in an industry closer to the software one, let’s talk about the Fairphone 2 released in 2016.

Fairphone 2

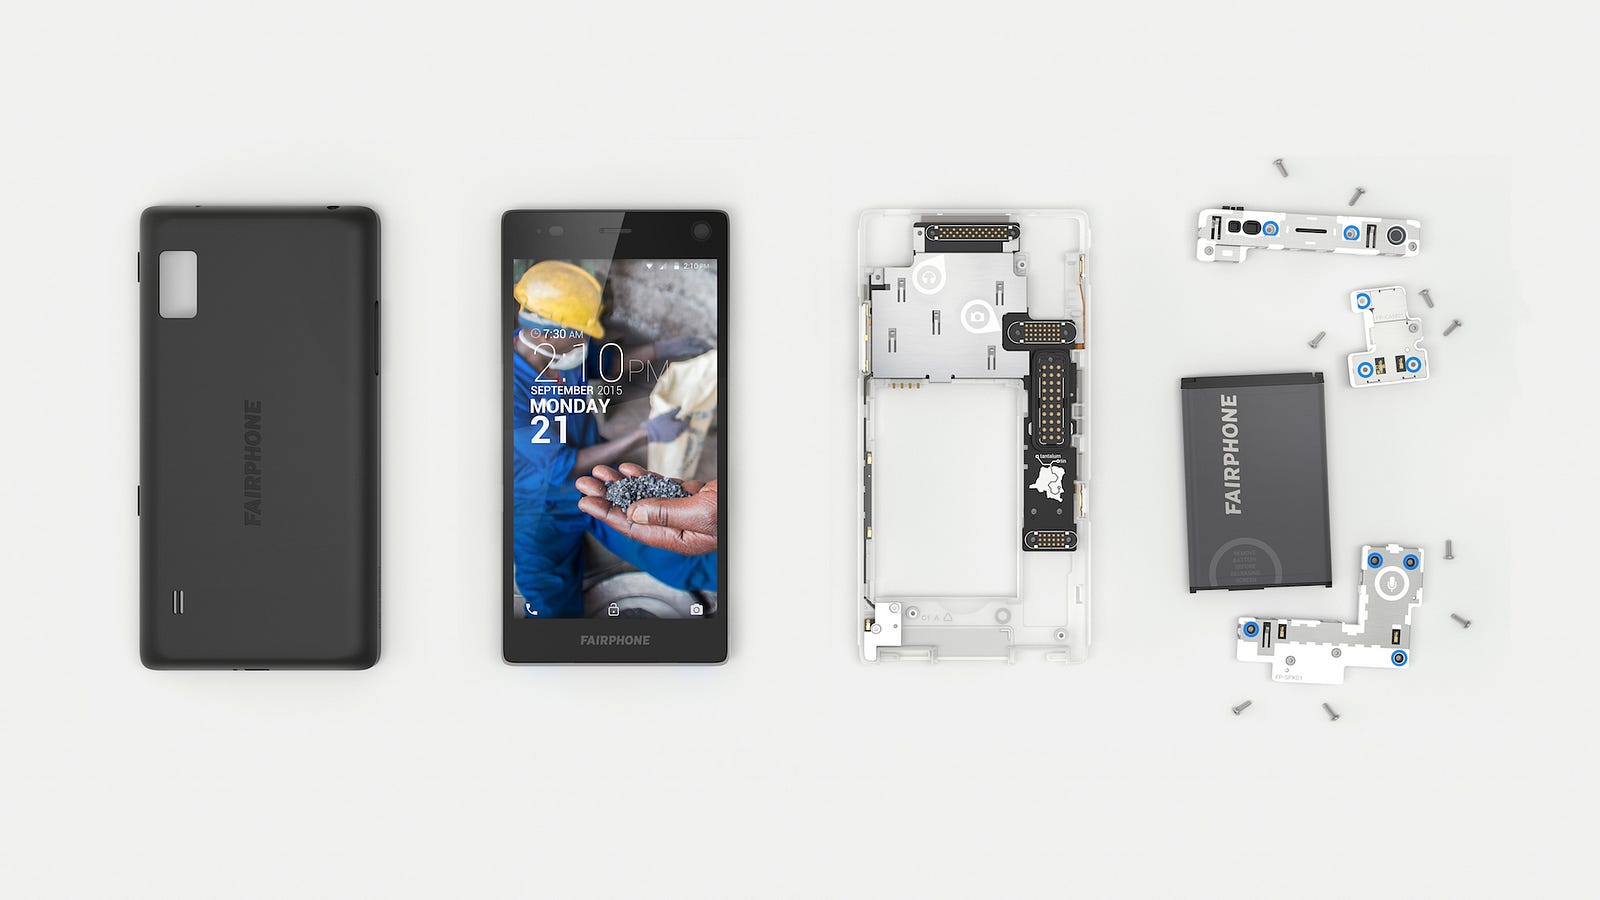
Fairphone 2 is a modular phone that will guarantee the longevity of your device changing different parts on demand instead the entire phone.
The company made the modularisation a feature of the new device.
Totally a different approach taken by Apple with the iPhone for instance where replacing a part of the phone is (almost) impossible.

Every time you are thinking on a new or existing project, think about how to modularise it, how to break dependencies and improve your code.
In particular how the different modules are going to “stick” together.
Often we don’t spend much time on the “contracts” between systems, but it’s very important investing the right amount of time for creating the “perfect glue” for your application.
Think how much we have done in the bast moving from a monolithic architecture to microservices where communication, monitoring and logging are way more important of the code is running inside a microservice for instance.

Wrapping up

We are often very busy working with new libraries, frameworks and languages; anyway sometimes we will need to stop for few hours or even a day, looking around us and understand that probably the next innovation in the software industry could be “borrowed” by existing tools already available in the real world.

Advertisement

HTTP2: the good, the bad and the ugly

I spent last few weeks investigating on HTTP2, the successor of HTTP1.1 and I’d like to share my findings and thoughts in this post.

Let’s start saying that if the question you have in mind at this point is: “Can I really use it today, not only for experiments but also in production?”
My answer would be: “YES, you can!”

First of all, I’d like to share with you the browsers implementation status for this protocol

screen-shot-2016-09-06-at-23-00-23

As you can see from the screenshot taken from caniuse.com it’s definitely well supported on the latest version of the major browsers with some caveats obviously.

If you are not convinced yet, please check this website with one of the browsers that currently supports HTTP2 and look how fast to load is!
I’d suggest to install the HTTP2 indicator Chrome extension to discover how many web apps or online services are using this protocol:

screen-shot-2016-09-07-at-21-41-09

Not yet convince?! OK let’s move to a deeper analysis then!

HTTP2 is a binary protocol with a multiplexing requests method implemented, that means all the browser requests will be handled asynchronously.

This massive change will increase drastically the performance of your application.
Considering at the moment a browser can download simultaneously a maximum of 5 resources per domain (let’s avoid talking about “resource sharding” for now), with HTTP2 we will be able to request all the resources and render them when the browser will accomplish their download, check this demo made with Go Lang for a proper comparison between the 2 protocols and check also the Network panel in the Chrome Dev Tools or Firefox dev tools in order to understand how the 2 protocols differ.

The Good

HTTP2 has really few rules in order to be implemented:

  • it works ONLY with https protocol (therefore you need a valid SSL certificate)
  • it’s backward compatible, so if a browser or a device where your application is running, don’t support HTTP2 it will fall back to HTTP1.1
  • it comes with great performance improvements out-of-the-box
  • it doesn’t require to do anything on the client side but on the server side for a basic implementation
  • few new interesting features will allow to speed up the load of your web project in a way that is not even imaginable with HTTP1.1 implementation

Despite the short list, HTTP2 is bringing a substantial change to the internet ecosystem.
One of my favourite feature is the server PUSH where a server can pass a link header specifying what the browser should download in advance before starting to parse entirely the HTML document.
In this case, we can educate the browser to download several resources like images, css or even javascript files before the engine recognise them inside the DOM, providing a better user experience to our web apps and/or games.

The Bad

There is still plenty of works to do in order to have a great penetration of this protocol, few specs are still on going (read the next paragraph: the ugly) and probably it will take quite few months before we will see a lot of services moving to this new protocol.

A part from the high level overview of the downsides, let’s look what will change on the technical side.

Considering that HTTP2 is not restrict on the amount of requests a browser is doing in order to download resources few techniques for optimising our websites will need to be reviewed or even removed from our pipeline.
Delivering all the application inside a unique javascript file won’t have any benefit with HTTP2, so we need to move our logic downloading only what we need when we need it.
Knowing that downloading large files won’t be a problem we could use sprites instead of several small images to handle the icons of our website.
Probably the different tools like Grunt, Gulp or Webpack will need to review their strategies or update their plugin in order to provide real value to this new project pipeline.

The Ugly

Google Chrome protocol implementation!
Chrome is my favorite browser and I use it extensively, in particular, when I need to debug a specific script or I need to gather metrics from a specific behavior of a web app.
At the moment it’s the only browser that requires HTTP2 server negotiation via ALPN (Application-Layer Protocol Negotiation) that basically is an extension allowing the application layer to negotiate which protocol will be used within the TLS connection.

Considering that OpenSSL integrates ALPN only from version 1.0.2, we won’t be able to enable HTTP2 protocol support for Chrome (from build 51 and above) if we don’t configure our server correctly.
For instance, on Linux OS, only Ubuntu from version 16.04 has that OpenSSL version installed by default, for all the other major Linux version you will either install the newer version manually or you’ll need to wait for the next major OS release.

I’d suggest reading carefully the article that describes this “issue” on ngnix blog before you start to configure your server for Chrome.

Wrap up

HTTP2 is not perfect and probably is not supported as it should be but, definitely, could improve (drastically in certain cases) your web project performance.
A lot of “big players” are already using HTTP2 protocols in production (Instagram, Twitter or Facebook for instance) and the results are remarkable.

Why not starting catching up with the future today?

ES2015 Destructuring assignment: by value or reference?

This week I’ve organised a meetup on ES2015 in my community, where the speaker presented his favourite features of the language.

Right after the talk I had a chance to talk with my best friend that was asking if destructuring assigns the values copying the value to the new variable or instead by reference if you work with Object or Array.
Because I hadn’t a change before to work with this new ES2015 feature I did a quick example just to get an answer to this question.

It looks like destructuring feature works by reference and it’s not copying the value.
That means anytime you’re going to change a value inside a variable that contains an Object or Array assigned via destructuring, also the original Object or Array will be affected as you can see in this simple example: destructuring example ES2015

destructuring ES2015

So when you work with destructuring bear in mind to pay a lot of attention when you change a value inside your destructured Objects and Arrays!

Haxe-watchify: automatic build tool for Haxe and OpenFL projects

I’ve started recently working in a new company very focused on cross platform projects with Haxe.
In my commuting time I worked on an automatic build tool for Haxe and OpenFL projects.
The tool is called haxe-watchify and with a sample JSON file or directly through the command line, you’ll be able to setup how to continuously build your project in background during your development flow.
Haxe-watchify has got interesting features in particular for the Haxe target like the possibility to setup the completion server instead the traditional compiler to speed up the building of your projects.
In fact the completion server implements a cache system to build faster your projects, in this case haxe-watchify takes care for you to start the server and communicate with it.

Currently I’ve published the tool on npm registry so in order to install it just type in your CLI:

npm install haxe-watchify -g

I wrote an extensive documentation on how to use the tool on the readme file on the project repository otherwise you can check the –help command directly on your terminal window.
I tried for now only on Mac OS X so if you find any bug in any other platforms please let me know

I’ve already thought few possible implementations to add in the next releases like a pre and post build in order to launch your tests or run static analysis tool or assets optimisation and then move to the build.
Anyway I’m very keen to learn more about your current projects workflow and how haxe-watchify could help you to improve your situation.

if you want to share any comment please do feel free to share adding a comment to this post or via email

Automate, automate and automate!

Recently I’ve spent several days on find the best way to set up an automation process for Javascript developers and I investigated several tools strictly related to the Javascript world.
These tools allow you to save a lot of time when you perform repetitive and sometimes boring tasks in order to test your HTML5 game, website or web app.
In this post I’d like to share with you what tools I’ve found and used to create a full-stack Javascript automation pipeline for any front end developer or team.

Let’s see what a Javascript developer or a team could automate in their machine to have a better code quality and to save a lot of time when they are working on their own library or projects.
For this purpose, in my pipeline, I’ve used different CLI tools like mocha, grunt, yeoman, blanket or plato.
Each of this tool allows you to perform a specific task but combined all together these tools will provide in your projects:

  • tdd, bdd and unit test
  • code coverage
  • dependencies management
  • (custom) project template
  • static analysis
  • tasks automation (live reloading, deploy in localhost folder, files concatenation…)

These are only few of the multiple options that you can have “playing” with these tools, but let’s try to go a little bit more in deep to see what tool can effectively help to accomplish each of the item present in the list above.

TDD, BDD and UNIT TEST

Surfing on the web about this topic on Javascript you’ll find really a lot of good libraries, the one I decided to use is Mocha because is very well integrated with Blanket (code coverage) and karma (tests runner) and because it’s based on node.js so you can create your libraries and then testing in pure javascript without any need to pass through HTML pages and if you need to test javascript code that will run only inside the browser you could fake the window object with libraries like jsdom integrated in your test cases.
Mocha allows you to work in BDD, TDD and in Unit Testing you can easily mix with several assertion libraries and writing also async tests became really really easy.
Other libraries that could be useful could be Jasmine or QUnit.

CODE COVERAGE

As I wrote before I found an interesting library that work perfectly with Mocha that is Blanket.js.
Blanket is very simple and easy to use library in particular when you have all your test written in modules (node.js style) instead of a mix between html and js files.
Blanket works not only with Mocha but also with Jasmine and QUnit, so basically with the most famous testing libraries!
One thing that I really appreciate of blanket is the final output that could be exported in an interactive HTML where immediately you can recognise what it’s not tested yet and jump from a file to another one following the menu on the right side of the template.
Another one that it seems quite interesting is Istanbul.js, I didn’t try yet but it’ll be the next one for sure, I heard really good experiences from other developers with this library!

STATIC ANALYSIS

When you want to use a static analysis tool in your pipeline on of the most popular is….
But I suggest to give a try to Plato in particular if you work alone or in a small team and you want to do a sanity check of your project.

8ek3snRZ22Eq898NOi-l9Dl72eJkfbmt4t8yenImKBVvK0kTmF0xjctABnaLJIm9
Plato, in fact, store all the information of your code project locally in some JSON files and you can navigate through the report directly from an HTML page created by the tool (above a screenshoot sample).
These stats are very interesting to check the are of improvement of your project and in particular with these tools you can have an immediate feedback on where your efforts should be focused in order to deliver a better product and be sure that the maintenance shouldn’t cost too much later on.
Obviously you can also use more sophisticated solutions like SonarQube and install it inside your server with the Javascript plugin and run your static analysis every time a developer push his code in git or mercurial.
Depends always the dimension of the project and the team, my suggestion is to start with Plato in a small project and then when you see the real value move to SonarQube also if you are a small organisation.r

PROJECT TEMPLATE

When you talk about template for Javascript it’s impossible to forget of Yeoman.
Yeoman is a scaffolding tool that allow you to create skeleton of project with your favorite JS library ready to use.
I really suggest to use these kind of tools because it facilitates the beginning of new projects and give you at the same time some standards inside your company and between your projects.
There are several generators ready to use and searchable from the official website, if you can’t find what you’re looking for it’s very easy use Node.JS and the APIs already built in Yeoman to create your own generator with the functionalities that your company or projects need.

TASKS AUTOMATION and DEPENDENCIES MANAGEMENT

This is my favourite part, I found in Grunt a really good tool to automate more or less everything that is not strictly related to write the project code inside my IDE!
Grunt is the glue to assembly in a pipeline all the tools explained above, easily in one line inside your CLI: “grunt”.
The community is really huge and you can find more or less everything for Node.JS or plain Javascript, from minify, uglify and concatenate your JS files, to compile your LESS or SASS files, to convert your ES6 code to ES5, to run static analysis or push your code directly on git simply with a grunt task.
One thing that I really like of Grunt is that you can easily scale the way you are working with it using a yaml file and different js files (one per task) and assembly them at runtime.
This allows to create some common tasks for the whole company and at the same time have the freedom to add custom automation for each project and/or department of your company.
I really suggest to take a look to the official website where you can find also many technical information and then start to automate your daily Javascript workflow.
Obviously if you’re not working with JS you can still use Grunt in combination with your favourite programming language or technology like Haxe, Dart, Typescript, Coffeescript or Adobe AIR; the flexibility of this tool is really impressive!

An Alternative to Grunt could be Gulp where the main difference is that grunt favours configuration over code and Gulp exactly the opposite.
The Gulp community is growing day by day and it’s interesting to see the different approach between these two great task runners, probably in the long term the Gulp approach will be more successful but for now Grunt is exactly what I was looking for.

Conclusion

As you’ve read the JS world has got really a lot of useful tool that will save a lot of time during your daily job as developer or company.
The mix of these tools allow to create a pipeline in pure Javascript and they could really improve your code quality and your flow to have standards inside yout projects and a solid flow that will able to scale your company or projects in an easy and professional way.
Obviously there aren’t only these few tools and libraries that I’ve tried, there are many others outside there that I’d like to mention like PhantomJS or Buster or Lineman and so on, but form the next five minutes before come back on what you were doing before reading this post, try to think how to improve your flow, trust me you will remain surprise on how more productive you’ll become introducing them inside your routine.

Git Flow vs Github Flow

Recently I’ve spent time to study a good way to manage a software projects with GIT.
I really read a lots of blog post to check different points of view and to find out which is the best technique to use in different situations.

The principals ways to manage a software in GIT are: the Git Flow and the Github Flow.
These 2 methods can really help you to manage your project and optimise your workflow in the team.
Let’s see the differences between them.

Git Flow

git flow
git flow

Git flow works with different branches to manage easily each phase of the software development, it’s suggested to be used when your software has the concept of “release” because, as you can see in the scheme above, it’s not the best decision when you work in Continuous Delivery or Continuos Deployment environment where this concept is missing.
Another good point of this flow is that fits perfectly when you work in team and one or more developers have to collaborate to the same feature.
But let’s take a look closer to this model.

The main branches in this flow are:

  • master
  • develop
  • features
  • hotfix
  • release

When you clone a GIT repository in your local folder you have immediately to create a branch from the master called develop, this branch will be the main branch for the development and where all the developers in a team will work to implement new features or bug fixing before the release.
Every time a developer needs to add a new feature he will create a new branch from develop that allow him to work properly in that feature without compromise the code for the other people in the team in the develop branch.
When the feature will be ready and tested it could be rebased inside the develop branch, our goal is to have always a stable version of develop branch because we merge the code only when the new feature is completed and it’s working.
When all the features related to a new release are implemented in the develop branch it’s time to branch the code to the release branch where there you’ll start to test properly before the final deployment.
When you branch your code from develop to release you should avoid to add new features but you should only fix bugs inside the release branch code until to you create a stable release branch.
At the end, when you are ready to push live deploy live your project, you will tag the version inside the master branch so there you can have all the different versions that you release week by week.
Apparently it could seem to much steps but it’s for sure quite safe and helps you to avoid mistakes or problem when you release, obviously to accomplish all this tasks you can find online a lots of scripts that could help you to work with Git flow in the command line or if you prefer you can use visual tools like SourceTree by Atlassian that make the dirty work for you, so you have to follow only the instructions inside the software to manage all the branches, for this reason I’ve also prepared a short video to see how use this flow with SourceTree

You can go more in deep about this flow reading these 2 interesting articles: nvie blog or datasift documentation.

Github Flow

Screen Shot 2014-03-08 at 23.07.36

So now, do you think that Github is working with Git Flow? Of course no! (Honestly I was really surprised when I read that!)
In fact they are working with a continuos deployment environment where there isn’t the concept of “release” because every time they finish to prepare a new feature they push live immediately (after the whole automation chain created in the environment).
The main concepts behind the Github flow are:

  • Anything in the master branch is deployable
  • To work on something new, create a descriptively named branch off of master (ie:new-oauth2-scopes)
  • Commit to that branch locally and regularly push your work to the same named branch on the server
  • When you need feedback or help, or you think the branch is ready for merging, open a pull request
  • After someone else has reviewed and signed off on the feature, you can merge it into master
  • Once it is merged and pushed to ‘master’, you can and should deploy immediately

I found an amazing interactive page where you can deepen the knowledge of this method, but I see it’s very common when you work in QA teams, small teams or you are working as freelance because it’s true that is a lightweight flow to manage a project but it’s also quite clear and secure when you want to merge your code in the master branch.
Another good resource about Github Flow is the blog post made by the Github evangelist Scott Chacon.
I recorded also a video on how to use Github flow with SourceTree:

If you have any other method to manage your project in GIT feel free to share because I’m quite interesting to see how you usually work with GIT and if there are better ways to work with and if you have any other feedback or question I’m here for you!

Photoshop, Edge Reflow and Edge Inspect: the new responsive workflow

Today I’d like to talk about something that is not strictly related to development process but that it’s very useful when you are running your company as freelance or entrepreneur or if you are team leader of a team.
One of the most important thing for me when you approach a new technology is not only understand if it could fit all your needs but also understand when you introduce in your team or company how to have the best result as soon as possible.
That’s why I keep always a lot of attention on how to create a flexible and elastic workflow that allow my team to create or modify client side solutions without waste our time.
In last years we rapidly see the grow of an hot topic, strictly related to HTML5 and Javascript, like Responsive Design, so the capability to create an interface that is viewable and usable on different devices (from smartphones to web browsers for instance).
Personally, if I didn’t find anything that help my team to be immediately very productive I usually avoid to introduce new softwares in the actual workflow, but this time we are in the middle of a big revolution where HTML5 and Javascript are the main protagonists.
During last Adobe MAX I saw a couple of interesting demo on Edge “family” and I was impressed on the capability of Edge Reflow and its interaction with Photoshop CC to create user interfaces for different devices in really few time, that’s why I was really waiting to test this feature and I’d like to share with you my first experiment.

rwdTools

Photoshop CC and Edge Reflow

I think a lot of designers create the UI for a project with Photoshop, last Monday (9th September) Adobe released an update of Photoshop CC and Edge Reflow, but we start with Photoshop because the news are really cool.
One of the most boring activity for a designer (or for me when I did it as freelance :D) is to cut all images and prepare assets in different folders for the developers.
Photoshop CC helps us introducing a new feature called Adobe Generator, a new way to automate this long and tedious phase, where the designer has only to follow some simple rules on how to nominate Photoshop levels and the software automatically export all the assets for us, ready to be delivered to the developers team!
For instance if you want to export a particular level as PNG you need only to nominate the level with a PNG extension (for example: “background.png”) and run the new Photoshop command Generate > Image Assets to have all our files ready to be added on the real project.

Photoshop Generate command

To know more about Adobe Generator and in particular to know how to set the name of each level I warmly suggest to take a look to Photoshop.com where there are all the information to do that.
Another option that we have (as you can see in the image above) is the capability to export the UI structure and the assets to Edge Reflow.
If you don’t know what is Edge Reflow I explain it in few words.
Edge Reflow is a tool useful to create responsive design layout and, from yesterday, completely integrated with Photoshop CC.
In fact now you can import in Edge Reflow your layout and you can start to customise it visually for any screen resolution your project will work.

Edge Reflow

The most interesting thing is that you can export from Photoshop an Edge Reflow project, or you can synchronise in real time the changes when the 2 softwares are open.
Then you can create your layout for different resolutions only copying and paste the code generate from Edge Reflow in your favorite code IDE; I mean copy and paste for now instead of import because probably (at 99%) you’ll have to improve or change it a little bit after paste but it’s really a good step forward for a software in preview like Edge Reflow.
With Edge Reflow you can create <div> adding box elements in your layout and you can show or hide elements present in different screen resolution simply with the options in the left side of the software interface.
Another very cool thing is the capability to work with your Typekit account (integrated in your Creative Cloud subscription) to download the fonts needed in the layout made with Photoshop.

Edge Reflow and Edge Inspect

Last but not least, Edge Reflow is integrated with another cool product of the Edge family called Inspect.
Edge Inspect is a simple application that you can add as plug-in in Chrome or you can download in your iOS or Android device from the relative store, and it allows you to test in real time all the changes you are doing in a website or more in general in HTML, JS or CSS file checking in real time the final result in one or more than one device simultaneously.
This is a capability that partially missed in the flash development workflow where the mobile test was a real pain (in particular the first releases of Adobe AIR on mobile), in this case with all those new technologies Adobe decides to evolve and improve this experience giving good tools to develop.

From a developer perspective

Personally I think that the integration of a technology like Node.JS in last Adobe softwares (Brackets, Adobe Generator, Edge Reflow and so on) is giving a real boost to them, and they are opening new horizons in the desktop application field, in particular I suggest to take a look to Node-Webkit, an open source project that allow you to work with HTML5, Javascript (Node.JS obviously) and WebGL to create desktop application for different platforms.
There are many other tools that could help to achieve the same goal like TideSDK for example, but I think Node-Webkit could be very interesting if the project will be well approach by the community.

Conclusions

Demo Photoshop and Edge Reflow

Finally the big players on the market are delivering tools that allow us to create engaging and amazing experience with HTML5 and Javascript like other technologies did in the past (Flash Platform in primis).
The combination of Photoshop CC, Adobe Generator, Edge Reflow and Edge Inspect give us a real flexible and integrated workflow where in few steps we can save a lot of hours spent on the code with great results.
Obviously those tools are new and in “preview” so they are not perfect but they are stable and useful enough at this point to be integrated in the actual daily workflow giving immediately importart results.
I really hope this is the first steps to give us the freedom to create instead became crazy to have layouts working in different browsers and devices.

Comparison of colours in Actionscript 3

In this post I’d like to highlight a topic that is not the classic tip to use everyday but when it needs probably this “recipe” could help.

In last few weeks I had the opportunity to study how to compare 2 or more images and find similar colors between them.
Sincerely when I started I really don’t know how to do that, so I tried to read on the web the best way to accomplish this task.
There are many different way to compare colours, the easiest way that I found it’s working with RGB color space but a lots of experts  advice against this technique and they suggest to run away from RGB color space and work with different color spaces, in particular with which one work in 3D space.
The most complete is for sure the CIELAB so if you need to create an algorithm that compare in the best way colours I really suggest to work with this color space and read this post on this topic, in my case I need something in the middle so a colour space that could guarantee the perfect trade off between complexity and accuracy.
In fact I worked in this example with a 3D space like HSV (Hue, Saturation, Value), before go ahead with the post I warmly suggest to read more about HSV directly on wikipedia.

Hue, Saturation, Value

And now let’s go ahead!!!

I prepare a class that you don’t need to change if the idea behind it fit your needs, so this is the code to compare 2 images with my ColorComparision object:

var util:ColorComparision = new ColorComparision();
var finalDiffArr:Array = util.getSimilars(bmp1.bitmapData, bmp2.bitmapData);

As you can see, in the second line you will receive an Array of colors in RGB that you can use if you want in the UI or only as data if you want to add more complexity to this algorithm.

This comparison is made in this way:

1. I retrieve 64 average colors inside each image (inside the class ColorComparision I set a constant if you need to change this value)
2. I convert each colour from RGB to HSV
3. I calculate the distance between each colour of the first image compared with each colour of the second image

To be more complete as possible I expose also the capability to set the tolerance of the comparison in this way:

util.tollerance = Math.round(slider.value);

Finally I made a quick example where you can play with your images and see what happens, basically in this basic sample when you’ll click “compare” button you will find the color similar between 2 images you will compare.

As3 Color Comparison

Last but not least I leave you also this quick method to translate RGB color to HEX  and use them in your Flash application:

function createRect(_obj:Object):Sprite{
 // the obj has 3 properties: r -> red, g -> green, b -> blue
 var intVal:int = _obj.r << 16 | _obj.g << 8 | _obj.b;
 var hex:String = "0x" + intVal.toString(16);

 var s:Sprite = new Sprite();
 s.graphics.beginFill(uint(hex));
 s.graphics.drawRect(0,0, 20, 20);
 s.graphics.endFill();

 return s;

}

On my github space you can find the source to use this algorithm, enjoy!

Dart: elements iteration and CSS manipulation

In my exploration of Dart I’m trying to work in some easy examples that could help me to understand how to accomplish some tasks with this technology.
In this example I tried to understand better how iteration of elements works in Dart, how to create a layout with custom elements (more or less the same topic of a custom item renderer in Flex for example) and finally how to create some animations with CSS3 at runtime.

To accomplish those topics I decided to create a responsive image gallery that works on smartphone, tablet and web too.

image gallery with dart

Responsive image gallery

Iteration

Dart gives few opportunities to iterate trough elements:

  • with Dart language (a classic for cycle)
  • with an HTML template
  • with elements composed by an HTML template and some dart code to cover the business logic of the final element

I jump directly to the second and third method, the first one is quite easy for any developer 😉
In my sample I decide to use a simple HTML template, so basically you can define inside your html a tag <template/> that will allow you to repeat the HTML inside this tag associating it to a list for example, I give you a quick sample:

 <div id="imageCont" class="wrap">
      <template iterate="data in results">
        <div class="image">
          <img id="img_{{data[0]}}" class="faded" src={{data[1]}} width="320" height="240" on-click="onClick($event)" on-mouse-out="onOut($event)" on-mouse-over="onOver($event)" on-load="fadeIn($event)"/>
          <img id="zoom_{{data[0]}}" src="images/zoom.png" class="zoom"/>
          <h2><span>{{data[2]}}</span></h2>
         </div>
      </template>
    </div>

First of all take a look on how I can iterate this part of code; I add a simple iterate attribute associated to a list object (called results in my example) added in my dart file as a public variable.
The list could be a plain list or a list of objects, in this last case you can create multiple iteration item inside the template cycling trough your objects in the same way you have just seen.
I can substitute my data variable with any other name and I don’t need to define in my dart file, as you can see I can also define some variables inside the template getting values from my list object with this syntax: {{data[0]}} (or {{data[“value”]}} it’s the same, depends how you have create the list object).
If you need, you can also made your source variables bindable and any time you’ll change the values of your list, also the view will change the number of elements or the values showed in the HTML page.

Finally when you need to create an iterable object with a complex business logic and you want to separate from the original HTML file you can do that creating a Web Components, but in this case I suggest you to take a look to the Dart language guide that explain very well how to achieve this topic.

Modifying CSS with Dart

Another interesting topic is how to change, add or remove css styles to my DOM objects.
In Dart is so easy like any other javascript library, so basically any DOM element in Dart has a property called “classes” with its associated method add and remove, so when you want to change your CSS class with another one, you have, if you have any classes already associated to the element, remove the old class and then add the new one:

var myDomObj = query("#idObject");
myDomObj.classes.remove("class-to-remove");
myDomObj.classes.add("class-to-add");

You can also style any single property directly with “style” property and set them directly in this easy way:

var myDomObj = query("#idObject");
myDomObj.style
             ..color = "0xFFF"
             ..fontSize = "15px";

As you can see working with CSS in Dart is relative simple, if you want to take a look to the whole project feel free to download it.

Another cool thing that is so useful when you work with mobile apps or websites is to test quickly and frequently your content on the devices, so with DartIDE (you can find it downloading Dart SDK) you can easily test your content trough a web server that starts any time you are testing your app into the browser.
It’s so interesting because you save a lot of time in this way!

I’m trying to figure out right now an hypothetical workflow to create web app, web sites or any other thing with Dart and HTML5.
I believe that use Dart in combination with Edge Reflow could be the best way to create responsive application for any kind of devices, but we have to wait until the release of Edge Reflow (17th June) to know if my supposition is true or not.
When it’ll be released and I’ve few time to invest, I’ll prepare another tutorial around this workflow.
In the meanwhile I hope you are enjoying those experiments with Dart and if you are interesting in any kind of topics on Dart feel free to suggest trough a comment in this post or sending an email

Tips & tricks to become a good developer

In my spare time I’m reading “Think like a Programmer. An introduction to creative problem solving” and I’d like to share with my followers some things that I learnt in first chapters of this book.


I’ve learnt 10 good rules to approach any problem/algorithm that you can meet during your daily job as developer:

  1. study the constrains of the project, so important to define the area of your project and how to approach it
  2. find analogies of problems that you solved in the past, it could help to resolve the new one
  3. divide the whole project in small tasks it helps to focalize and to define better the effort of each task
  4. starting with the known tasks and then go ahead with others (in that case I usually start with what I don’t know, because after that, I can go ahead quickly with the rest of the project, it works with me 😛 )
  5. divide any problem in different parts, it’s more easy solve small issues than 1 big
  6. you ALWAYS need a plan to solve a problem (using collateral thought, I suggest to start with Google, in most cases someone else has approached the same problem and probably solved it)
  7. try to watch the problem in different way, it’s essential to find the right solution to implement the algorithm in your project
  8. make own the solutions of issues, it’s so important because next time you’ll find a problem you’ll know how to approach it (point 2 of this list)
  9. create samples highly focused on a particular functionality to accomplish your tasks, sometimes make a simple example helps your to find the solution of a big problem.
  10. don’t get disheartened on a problem, it’s normal to find them, it’s your job!!!

I hope could help many developers that start to approach this job and, to the others, I hope you use many of those tricks in your projects and if you have another feel free to share them with a comment to this post.

If I’ll found more tricks to share reading this cool book I’ll post them again.
Finally If you are interested to read it, I’ll share the link here.