Geo-routing, A/B testing and dynamic configuration with Lambda@Edge — part 1

Working at the edge is one of the fantastic opportunities offered by Amazon and AWS Lambda is the key component for enhancing our infrastructure on the edge.
More recently many other vendors started to offer similar services like Cloudflare with edge workers for instance, in general many CDNs providers are looking to add a similar service like the AWS one.

Lambda@Edge introduction

Lambda@Edge provides you the possibility to extend the behaviours of a request or response directly on the edge.
This paradigm, in conjunction with the serverless one, can provide a great flexibility in structuring our applications and it can prevent that too many requests hit our application servers executing operations directly on the edge like headers manipulation, access control, redirection rules, images manipulation and so on.
In order to work with Lambda@Edge in AWS we just need to setup a Cloudfront distribution in front of our infrastructure, the Cloudfront distribution will allow us to setup our logic on the edge because we are able to intercept the 4 states of a request and interact with them.
In fact Lambda@Edge can be triggered at:

· viewer request: in this case the lambda is triggered when Cloudfront receives a request from a client
· origin request: the lambda is triggered before Cloudfront forwards the request to origin
· origin response: this state happens after origin replies to a request and Cloudfront receives it
· viewer response: the last state is triggered when Cloudfront forwards the response to the client.

Cloudfront is a global CDN therefore Lambda@Edge is triggered on any edge available across the world.
This means that independently from the region we set our data centre, we can manipulate or serve responses on the edge before they even arrive to our application servers.

I spent some time working on a spike for handling 2 specific features, geo-routing and a/b testing, in the mix I tried also to dynamically retrieve configurations parameters for the Lambda in order to avoid code deployment for every change I needed to do.
I’ll share the results of my spike between 2 posts, this one talks about the initial thoughts, goals and results achieved with Lambda@Edge, the second one will be more technical and I’ll explain how I configure Cloudfront, the Lambda code and setup and the overall setup for interacting with other AWS services on the edge.

Spike goals

Before we start I think is valuable understanding what I wanted to achieve with this spike, the goals are:

1. geo-routing a request to a specific static file stored in S3 bucket based on user country
2. A/B testing different applications serving always maintaining a sticky session per browser so a user always interacts with the same version
3. The previous 2 goals shouldn’t significantly impact the response time, Lambda@Edge has to be executed redirecting the user to the correct static file in 50ms or so
4. “bonus goal” is the possibility to dynamically apply different configurations without redeploying the Lambda code and without impacting too much the response time

Lambda@Edge configuration and limits

All that glitters ain’t gold! Lamba@Edge has several limitations that we need to be aware of before taking it in considerations.
In order to achieve the geo-routing we need to receive from Cloudfront the country viewer header, that will be used to determine where the request is coming from.
This header is received right after Cloudfront forwards the request to origin, we won’t receive at the viewer request state, therefore our Lambda has to be triggered as origin request.
Bear in mind that Cloudfront removes all the headers if not whitelisted for increasing the response cachability, so when we configure our distribution we need to whitelist some specific headers or all of them, depends from our needs.

Lambda@Edge is a particular kind of Lambda with different limitations than the one we are used to work inside an AWS data centre.
First of all the Lambda@Edge has to be created in North Virginia only, we can associate only a numeric released with Cloudfront and not the $latestversion.
When we debug our Lambda@Edge we need to remember that all the logs in Cloudwatch won’t be available in North Virginia only but in the nearest data centre from where the Lambda was executed, for instance I’m based in London therefore during the spike, all the logs on Cloudwatch were available in the London AWS data centre only.
Finally we have also some soft limits to take in consideration like max memory associated to our Lambda@Edge, concurrent executions and so on, you can find them in the image below:

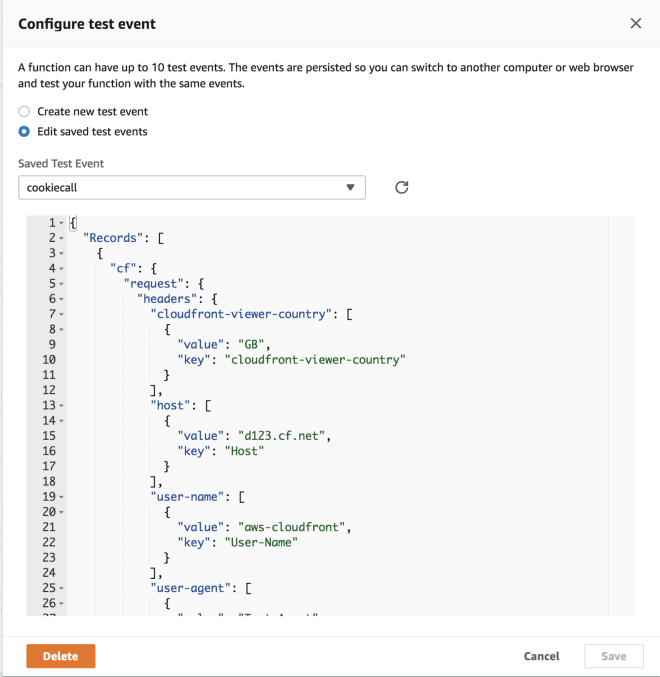
An important thing to remember is how to debug our Lambda@Edge, luckily AWS thought pretty well about this point and they provide a way to simulate an origin request customising the parameters to send it directly from the Lambda console:

Geo-routing

The Geo-routing feature was really easy to achieve considering that Cloudfront provides everything we need out-of-the-box.
After whitelisting the cloudfront-viewer-country header we can receive in our Lambda@Edge the country from where the request was coming from and we can apply the behaviour we need for that specific country.

After configuring Cloudfront distribution properly we can think about describing our behaviour in the Lambda@Edge, in this case I used Node.js for defining the logic:

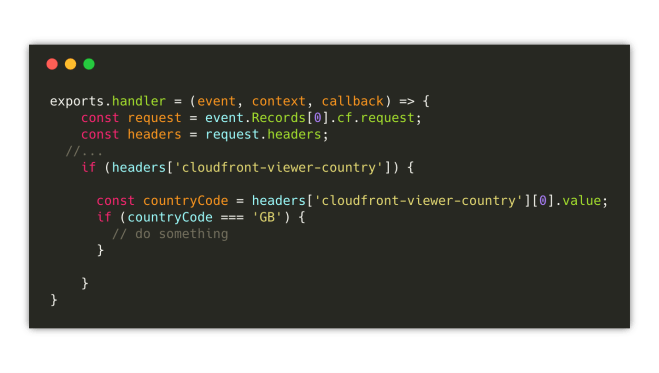
These are the headers we are going to receive from Cloudfront:

As we can see the implementation is really easy despite the APIs that could have been designed in a more “friendly” way, but I appreciate they are very extensible and flexible allowing the introduction of new features and maintaining retro-compatibility.

A/B testing

For A/B testing the best way to achieve that on the edge is using cookies after select the static file to serve, also in this case we need to configure properly the Cloudfront distribution for forwarding the cookies to the Lambda@Edge:

In this spike for a specific country I was able to redirect a certain percentage of users to a static file and all the others to another one.
This mechanism becomes very handy when we want to test new versions of our web applications, so we can do a canary release and see how the new version behaves compare to the previous one.
Combining A/B testing functionality with the geo-routing feature we can deploy a new artifact in a specific country with a small percentage of users redirected to it, leaving the majority of our users consuming the previous version.
Considering we are using cookies, bear in mind that all the latest version of the browsers allow to store a cookie before doing a redirection but if you are targeting older browsers like IE 10 or similar it’s better to give it a try.
The same concern is valid if you have in your logic multiple redirections in place.

Dynamic Configuration

The bonus feature for the spike was retrieving a configuration for the URLs and the percentage of users we need to redirect on a region basis.
In this case I tried a couple of solutions, the first one with DynamoDB and the second with an S3 bucket where I stored a JSON file.
First of all I need to admit I was surprised that I was able to access a Dynamo table from the edge considering Dynamo is not global like S3 or Cloudfront, so I decided to give it a go.
I structured my table with an ID for each single information I wanted to make dynamic (the URL of an experiment, the percentage of users to redirect to a static file or the other one…) and then I tried 2 approaches, one using scanmethod and the other using get method.
Using scan was slightly slower than using get method but in any case I was over 50ms for Lambda execution therefore DynamoDB wasn’t a viable option for this use case.

I then tried a simple JSON file stored in a S3 bucket, in this case I was able to quickly configure my Lambda retrieving all the parameters I needed for changing URLs or percentage of users redirected to a specific experiment without redeploy the Lambda code.

This could look a small win but you will understand soon that for deploying a new version of a Lambda@Edge we need around 15 minutes before it’s fully propagated across the world.
Retrieving the parameters from an external file allowed to change the key part of the script in a matter of seconds, just the time to make the change in the JSON file and upload on S3.

Considering the operations we usually handle on the edge are very delicates for our infrastructure, having a mechanism to quickly change the behaviour of our logic is fundamental in particular if you are running a B2C service like in my case.

Performances

I didn’t mention in the post any metric because I wanted to gather them in a paragraph for easily compare them, so I created this table related to the executed time in each test I did for achieving the full functionality.
In the table you will see 4 scenarios:
. without any external configuration
. retrieving a JSON file from a S3 bucket
. using DynamoDB with the get method
. using DynamoDB with the scan method

I’d like to add a bit of more context just to make sure you understand how these metrics were retrieved.
DynamoDB was created in North Virginia and the Lambda was running from Europe, I didn’t try yet working with Global Tables but that will be part of a new spike I need to do in the next month, Global Tables could effectively change the execution time of the Lambda but we’ll see.
The execution time for each lambda was gathered from Cloudwatch running each scenario at least 10 times and providing the average you can see in the table.

I leave to you the considerations on the different methods used during the spike.

Useful resources

Following I gathered some useful resources for starting your journey… on the edge

Lambda@Edge limits
Lambda@Edge restrictions
Lambda@Edge pricing
Cloudfront and Lambda@Edge
Routing at the edge tutorial

Wrap up

As we have seen in this post, Lambda@Edge can become very handy for many situations, in particular for alleviating the load of our application servers.
The spike described above is just one of the many possibilities that Lambda provides on the edge, searching on the web you can find interesting tutorials like image manipulations or JWT validation on the edge, this could be just the beginning of a new way to structure our applications providing better performances and easy configurations for our web applications or APIs.
If you are wondering what would be the cost of using Lambda at the edge I leave you with this cost scenario available on the AWS website:

In the next post I’ll present how I set up Cloudfront, S3 and the Lambda code for achieving the goals of my spike, keep an eye on my social accounts 😉

Photoshop, Edge Reflow and Edge Inspect: the new responsive workflow

Today I’d like to talk about something that is not strictly related to development process but that it’s very useful when you are running your company as freelance or entrepreneur or if you are team leader of a team.
One of the most important thing for me when you approach a new technology is not only understand if it could fit all your needs but also understand when you introduce in your team or company how to have the best result as soon as possible.
That’s why I keep always a lot of attention on how to create a flexible and elastic workflow that allow my team to create or modify client side solutions without waste our time.
In last years we rapidly see the grow of an hot topic, strictly related to HTML5 and Javascript, like Responsive Design, so the capability to create an interface that is viewable and usable on different devices (from smartphones to web browsers for instance).
Personally, if I didn’t find anything that help my team to be immediately very productive I usually avoid to introduce new softwares in the actual workflow, but this time we are in the middle of a big revolution where HTML5 and Javascript are the main protagonists.
During last Adobe MAX I saw a couple of interesting demo on Edge “family” and I was impressed on the capability of Edge Reflow and its interaction with Photoshop CC to create user interfaces for different devices in really few time, that’s why I was really waiting to test this feature and I’d like to share with you my first experiment.

rwdTools

Photoshop CC and Edge Reflow

I think a lot of designers create the UI for a project with Photoshop, last Monday (9th September) Adobe released an update of Photoshop CC and Edge Reflow, but we start with Photoshop because the news are really cool.
One of the most boring activity for a designer (or for me when I did it as freelance :D) is to cut all images and prepare assets in different folders for the developers.
Photoshop CC helps us introducing a new feature called Adobe Generator, a new way to automate this long and tedious phase, where the designer has only to follow some simple rules on how to nominate Photoshop levels and the software automatically export all the assets for us, ready to be delivered to the developers team!
For instance if you want to export a particular level as PNG you need only to nominate the level with a PNG extension (for example: “background.png”) and run the new Photoshop command Generate > Image Assets to have all our files ready to be added on the real project.

Photoshop Generate command

To know more about Adobe Generator and in particular to know how to set the name of each level I warmly suggest to take a look to Photoshop.com where there are all the information to do that.
Another option that we have (as you can see in the image above) is the capability to export the UI structure and the assets to Edge Reflow.
If you don’t know what is Edge Reflow I explain it in few words.
Edge Reflow is a tool useful to create responsive design layout and, from yesterday, completely integrated with Photoshop CC.
In fact now you can import in Edge Reflow your layout and you can start to customise it visually for any screen resolution your project will work.

Edge Reflow

The most interesting thing is that you can export from Photoshop an Edge Reflow project, or you can synchronise in real time the changes when the 2 softwares are open.
Then you can create your layout for different resolutions only copying and paste the code generate from Edge Reflow in your favorite code IDE; I mean copy and paste for now instead of import because probably (at 99%) you’ll have to improve or change it a little bit after paste but it’s really a good step forward for a software in preview like Edge Reflow.
With Edge Reflow you can create <div> adding box elements in your layout and you can show or hide elements present in different screen resolution simply with the options in the left side of the software interface.
Another very cool thing is the capability to work with your Typekit account (integrated in your Creative Cloud subscription) to download the fonts needed in the layout made with Photoshop.

Edge Reflow and Edge Inspect

Last but not least, Edge Reflow is integrated with another cool product of the Edge family called Inspect.
Edge Inspect is a simple application that you can add as plug-in in Chrome or you can download in your iOS or Android device from the relative store, and it allows you to test in real time all the changes you are doing in a website or more in general in HTML, JS or CSS file checking in real time the final result in one or more than one device simultaneously.
This is a capability that partially missed in the flash development workflow where the mobile test was a real pain (in particular the first releases of Adobe AIR on mobile), in this case with all those new technologies Adobe decides to evolve and improve this experience giving good tools to develop.

From a developer perspective

Personally I think that the integration of a technology like Node.JS in last Adobe softwares (Brackets, Adobe Generator, Edge Reflow and so on) is giving a real boost to them, and they are opening new horizons in the desktop application field, in particular I suggest to take a look to Node-Webkit, an open source project that allow you to work with HTML5, Javascript (Node.JS obviously) and WebGL to create desktop application for different platforms.
There are many other tools that could help to achieve the same goal like TideSDK for example, but I think Node-Webkit could be very interesting if the project will be well approach by the community.

Conclusions

Demo Photoshop and Edge Reflow

Finally the big players on the market are delivering tools that allow us to create engaging and amazing experience with HTML5 and Javascript like other technologies did in the past (Flash Platform in primis).
The combination of Photoshop CC, Adobe Generator, Edge Reflow and Edge Inspect give us a real flexible and integrated workflow where in few steps we can save a lot of hours spent on the code with great results.
Obviously those tools are new and in “preview” so they are not perfect but they are stable and useful enough at this point to be integrated in the actual daily workflow giving immediately importart results.
I really hope this is the first steps to give us the freedom to create instead became crazy to have layouts working in different browsers and devices.

Dart: elements iteration and CSS manipulation

In my exploration of Dart I’m trying to work in some easy examples that could help me to understand how to accomplish some tasks with this technology.
In this example I tried to understand better how iteration of elements works in Dart, how to create a layout with custom elements (more or less the same topic of a custom item renderer in Flex for example) and finally how to create some animations with CSS3 at runtime.

To accomplish those topics I decided to create a responsive image gallery that works on smartphone, tablet and web too.

image gallery with dart

Responsive image gallery

Iteration

Dart gives few opportunities to iterate trough elements:

  • with Dart language (a classic for cycle)
  • with an HTML template
  • with elements composed by an HTML template and some dart code to cover the business logic of the final element

I jump directly to the second and third method, the first one is quite easy for any developer 😉
In my sample I decide to use a simple HTML template, so basically you can define inside your html a tag <template/> that will allow you to repeat the HTML inside this tag associating it to a list for example, I give you a quick sample:

 <div id="imageCont" class="wrap">
      <template iterate="data in results">
        <div class="image">
          <img id="img_{{data[0]}}" class="faded" src={{data[1]}} width="320" height="240" on-click="onClick($event)" on-mouse-out="onOut($event)" on-mouse-over="onOver($event)" on-load="fadeIn($event)"/>
          <img id="zoom_{{data[0]}}" src="images/zoom.png" class="zoom"/>
          <h2><span>{{data[2]}}</span></h2>
         </div>
      </template>
    </div>

First of all take a look on how I can iterate this part of code; I add a simple iterate attribute associated to a list object (called results in my example) added in my dart file as a public variable.
The list could be a plain list or a list of objects, in this last case you can create multiple iteration item inside the template cycling trough your objects in the same way you have just seen.
I can substitute my data variable with any other name and I don’t need to define in my dart file, as you can see I can also define some variables inside the template getting values from my list object with this syntax: {{data[0]}} (or {{data[“value”]}} it’s the same, depends how you have create the list object).
If you need, you can also made your source variables bindable and any time you’ll change the values of your list, also the view will change the number of elements or the values showed in the HTML page.

Finally when you need to create an iterable object with a complex business logic and you want to separate from the original HTML file you can do that creating a Web Components, but in this case I suggest you to take a look to the Dart language guide that explain very well how to achieve this topic.

Modifying CSS with Dart

Another interesting topic is how to change, add or remove css styles to my DOM objects.
In Dart is so easy like any other javascript library, so basically any DOM element in Dart has a property called “classes” with its associated method add and remove, so when you want to change your CSS class with another one, you have, if you have any classes already associated to the element, remove the old class and then add the new one:

var myDomObj = query("#idObject");
myDomObj.classes.remove("class-to-remove");
myDomObj.classes.add("class-to-add");

You can also style any single property directly with “style” property and set them directly in this easy way:

var myDomObj = query("#idObject");
myDomObj.style
             ..color = "0xFFF"
             ..fontSize = "15px";

As you can see working with CSS in Dart is relative simple, if you want to take a look to the whole project feel free to download it.

Another cool thing that is so useful when you work with mobile apps or websites is to test quickly and frequently your content on the devices, so with DartIDE (you can find it downloading Dart SDK) you can easily test your content trough a web server that starts any time you are testing your app into the browser.
It’s so interesting because you save a lot of time in this way!

I’m trying to figure out right now an hypothetical workflow to create web app, web sites or any other thing with Dart and HTML5.
I believe that use Dart in combination with Edge Reflow could be the best way to create responsive application for any kind of devices, but we have to wait until the release of Edge Reflow (17th June) to know if my supposition is true or not.
When it’ll be released and I’ve few time to invest, I’ll prepare another tutorial around this workflow.
In the meanwhile I hope you are enjoying those experiments with Dart and if you are interesting in any kind of topics on Dart feel free to suggest trough a comment in this post or sending an email