Orchestrating micro-frontends

How can we orchestrate our micro-frontends architecture?

Following the previous posts on micro-frontends (1 and 2), it’s time to talk about how to orchestrate micro-frontends.

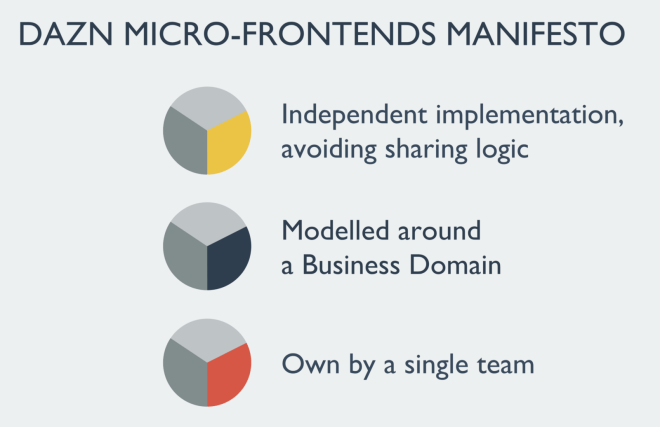
First of all and foremost, there are 2 schools of thoughts about how a micro-frontend should look like, as explained in the previous article where I was explained different implementations of micro-frontends, there are implementations where a micro-frontend correspond to an area of the user interface, others where the micro-frontend is a SPA or a single page.

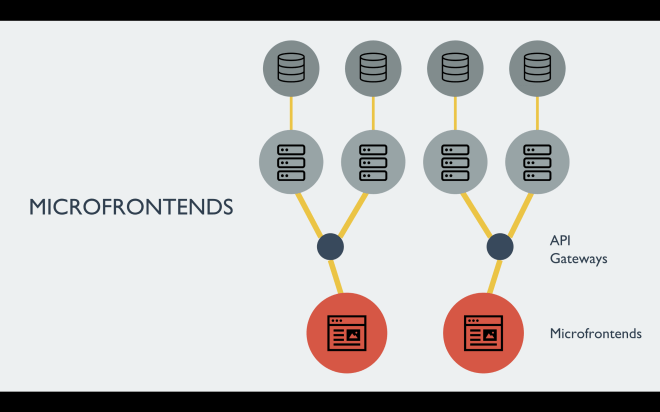
When we consider the micro-frontends implementation based on different logical areas of the application (like a header, a footer, a payment form and so on) we would face different challenges like:
Which team would assemble the aggregated view?
How can we avoid external dependencies in every team?
Which team is accountable for an issue in the aggregated view?
How do we ensure that a specific area of the application is not tightly coupled with the parent container?
How can we be sure there aren’t conflicts between dependencies?
Are we assembling at runtime or compile time?
If we decide to create the page at runtime time, is our application servers layer scalable?
Is the content cachable and for how long?
How do we ensure the development flow is not impacted by distributed teams?

And many other questions (technical and organisational) that could make our life way more complicated than how it could be.
Interestingly enough, this approach didn’t provide the expected benefits for Spotify working at scale and they reverted back to a more “classic” architecture based on SPA.

For the benefits of this post, let’s define our micro-frontends as SPA or single pages with a generation made at compile time in order to avoid any possible surprise happening at the composition layer.

Anyway, there are some challenges to face also with this approach, probably the main one is understanding how we want to orchestrate our micro-frontends and it is the focus of this post.
The orchestrator layer could be either on the client-side, server-side or edge-side; the solution depends on how “smart” the orchestrator layer should look like for our applications.

Server-side or edge-side orchestrator

A server-side or edge-side orchestrator would mean that for any deep-link or organic traffic hitting our domain has to be analysed by an application server or an edge solution (lambda@edge for instance), in both cases we need to maintain a map of URLs that correspond to static HTML files (aka micro-frontends).
For instance, if a user logs out from our application we should probably unload the authenticated micro-frontend and load the sign in/sign up micro-frontend, therefore the application server or the code running on the edge should know which HTML file to serve for every URL or group of URLs in the case we are going to work with SPAs.
This technique could work without any problem considering we can change quickly the micro-frontends map directly on the server without any impact on the client-side, but presents some potential challenges, like finding the best way to share data across micro-frontends considering there are some limits of storage inside the browser and doing too many roundtrips to the servers is not ideal in particular for slow connections.
Another challenge would be finding a solution for initialising the application, considering with micro-frontends we split the monolith into multiple subdomains, are we going to initialise the application every time a new micro-frontend is loaded? Are we going to use Server Side Rendering storing the configuration inside the HTML? How do we communicate between micro-frontends? How do we scale our application servers when there is bursty traffic?
Those are some of the challenges for implementing a server-side or edge-side orchestrator.

Client-side orchestrator

Another possible approach could be to create a client-side orchestrator responsible for:

— initialise the application
— sharing the application’s configurations to all the micro-frontends
— load/unload a micro-frontend based on the user’s state
— routing between micro-frontends
— exposing an API for interacting between a micro-frontend and the client-side orchestrator

One of the PROs of this solution is that you have more control over the application initialisation.
If well designed, the client-side orchestrator doesn’t need to change too often, therefore, will be fairly stable.
It provides additional functionality that could be used by various micro-frontends but it’s not domain specific, it’s also a great solution when our aim is to abstract our micro-frontends from the platform they are running on (browser instead of mobile devices or smart TVs).
The main CON is the initial investment in identifying which feature should be handled by this orchestrator because the risk of a big ball of mud is behind the corner, a bug on this layer could blow up the entire application and the implementation of new features, if not well co-ordinated, could slow down other teams creating a cross-team dependency.

In DAZN we opted for a client-side orchestrator that we called bootstrap.

Bootstrap has all the responsibilities listed above plus an additional one related to our use case, in fact, bootstrap is abstracting the I/O APIs of the platform where the application is running on, in this way each micro-frontend is completed unaware in which platform is loaded.
With this technique, we can re-use a micro-frontend across multiple smart TVs, consoles or set-top boxes without the need to rewrite specific device’s implementations, unless the implementation has memory leaks or performance issues.
Bootstrap is served every time a user types our domain in the browser or opens the application on a smart TV, it’s always present and never unloaded for the entire duration of the user session.

DAZN loading flow 

Let’s try to expand further about the bootstrap in order to understand the main ideas behind it:

Initialise the application

Bootstrap should be responsible to set the application context, first of all understanding if the user is authenticated or not and based on the application initialisation we can load the correct micro-frontend.
Any other meaningful information your application needs for setting the context for the entire application should be managed at this stage.
It could be a static configuration (JSON) or dynamic one where an API needs to be consumed, either way, having an external configuration for our frontend allow us to change some behaviours of our system without the need of bootstrap releases.
For instance, a configuration could provide valuable information for the application lifecycle like features toggles, localised labels for the user interface and so on.

Micro-frontends routing

Bootstrap is definitely responsible for routing between micro-frontends, in our implementation, we have 2 routing spread between bootstrap and every micro-frontend.
Bootstrap doesn’t have the entire URLs map of our applications, instead, it loads in memory a map of which micro-frontend should be loaded based on the user status and the URL requested via user’s interactions or deep link.
Those two dimensions allow us to load the correct micro-frontend and leave to the micro-frontend code handling the URLs to manage inside different views that compose it.
A rule of thumb here is to assign a specific second level path for a micro-frontend so it would be easier to address the scope of a micro-frontend, for instance, the authentication micro-frontend should be loaded when the user types mydomain.com/account/*, instead, the micro-frontend for the help pages should be loaded when the user clicks on a link like mydomain.com/support/* and so on.
Inside every single micro-frontend, we can then decide to have additional paths like mydomain.com/support/help-page-A or mydomain.com/support/help-page-B, in this way the domain knowledge would be retained inside the micro-frontend without spreading it across multiple parts of the application.

The main takeaway here is that we have two types of routing in a micro-frontend application with a client-side orchestrator, a global one at bootstrap level and a local one inside the micro-frontend.

Micro-frontends lifecycle

As we mentioned before, each micro-frontends should be loaded via the boostrap, but how?
Single-spa, for instance, uses a javascript file as an entry point for mounting a new micro-frontend.
In DAZN, we took a different approach because using just a javascript file for loading a micro-fronted would have precluded the possibility to use server-side rendering at compile time that was an interesting option for us to provide faster feedback to our user meanwhile they were transitioning from a micro-frontend to another one.

Micro-frontend anatomy: HTML, JavaScript and CSS files

Considering an HTML file is basically an XML file with a specific schema, bootstrap can load and parse the file appending inside itself all the relevant nodes for loading a micro-frontend using DOMParser, a standard interface for parsing XML or HTML strings.
Anything inside the body or head tags could be appended inside bootstrap’s DOM tree.
Potentially, we can also decide to define specific attributes for all the tags we need to append in order to have a quick way of selecting them.
Anyway, the overall idea is parsing an HTML file and appending inside bootstrap what is needed for loading the micro-frontend, therefore any external dependency (like a JavaScript or CSS file) present in the micro-frontend HTML file will be appended and therefore loaded by the browser.

A huge benefit of this neat approach is that it’s not opinionated, anyone can start working on a new micro-frontend without learning the way we decided to deal with micro-frontends because at the end, as long the micro-frontend output results in the Frontend holy trinity: an HTML, a JavaScript and a CSS files.

I captured a video throttling the connection in order to show how the bootstrap appends the DOM elements inside itself, as you will see there are 4 phases:
— identifying the micro-frontend to load,
— load the HTML of the micro-frontend,
— parse it,
—append the relevant tags for displaying the micro-frontend in the page.
It’s a very simple but effective mechanism!

An additional feature added to each micro-frontend is the possibility to perform some actions after and before are mounted or unmounted, in this way the micro-frontend can do any logic for cleaning up any object appended to the window object or any other logic to run in one of the 4 lifecycle’s methods mentioned before.
Bootstrap is responsible to trigger the micro-frontend lifecycle methods and clean the memory before loading the next micro-frontend, this action ensures no conflicts are happening in different or the same versions of a library used by different micro-frontends.

Bootstrap memory and dependencies management

It’s time to deep dive into the micro-frontends memory management, considering bootstrap is loading one micro-frontend per time, as explained in the previous post, and each micro-frontend is not sharing any library or dependency with another micro-frontend, we could end up in a situation where a micro-frontend is loading React v.15 and the next one React v.16.
At the same time, we want to have the freedom to pick any technology and library version inside every micro-frontend because the development team that retain the business and technical knowledge should make the best implementation choice available instead of having constant trade-offs across the entire application as usually happens when we work with a Single Page Application.

At this stage, I believe is very easy to guess the challenge we are facing because any library or framework used by a micro-frontend will append objects on the global window one and in Javascript we cannot directly control the garbage collector but we can facilitate the disposal of an element removing all the references and instances of a given object.

For achieving this goal, an additional bootstrap responsibility is keeping track of any object that is appended to the window object by any micro-frontend and cleaning the window object after unloading the micro-frontend but before a new one is loaded (the joy of metaprogramming in JavaScript 🎉).
Bootstrap takes a snapshot of all the keys appended to the window object and removes them before loading a new micro-frontend, in this way we keep track of what should be removed without duplicating any objects in memory and with a simple iteration of this array we delete any objects used by the unloaded micro-frontends inside the window object.

APIs layer for communicating between bootstrap and a micro-frontend

The last bit worth mentioning is the APIs layer exposed by the bootstrap via the window object.
If you asked yourself how we share data and communicate between micro-frontends, bootstrap is the answer!

Remember that our implementation is based on the assumption we always load one micro-frontend per time and we slice a micro-frontend based on a subdomain of our application, you will soon realise that the data shared across micro-frontends are not happening too often if you work well in the initial session where you define all your subdomains.
Sharing data between micro-frontends is pretty easy, bootstrap shares some APIs for storing and retrieving information accessible by any micro-frontends, it’s up to you deciding which storage is more convenient for your implementation and what kind of limits you wanna add to the objects to store locally.
Considering the bootstrap is a tiny layer written in vanilla JavaScript in between a platform and a micro-frontends and it’s initialising the application, we need also to expose an API layer for abstracting the I/O layer for storing or retrieving information from and to a micro-frontend.
Working with multiple devices require to have different APIs for storing and retrieving files because web storage APIs are not always consistent across all those platforms.
Another important part to highlight is the configuration retrieved from a static JSON file or an API that usually is shared with all the micro-frontends to understand the context where they are running (for instance sharing particular configuration based on the country or languages).

The most important thing when we design the APIs exposed by the bootstrap is trying to be forward-thinking because the bootstrap should be a layer that doesn’t change at every release otherwise you could break some contracts with micro-frontends and coupling the micro-frontends to bootstrap functionalities could jeopardise all the great work done splitting up your business domain in multiple subdomains.

Summary

During this post, we have explored the possibilities for orchestrating micro-frontends, we deep dive into the client-side orchestrator that in DAZN is called bootstrap, in particular, we have seen the benefits and the challenges of this approach and how we have managed to solve them.
In particular, we saw the bootstrap has 3 main responsibilities:

— routing between micro-frontends (load, unload and lifecycle methods)
— initialise the application
— exposing an APIs layer for micro-frontends communication and web storage

One of the questions I received very often after sharing those posts is if and when the bootstrap will be open-sourced, the answer is that we are thinking about that but we cannot commit to a timeline at the moment (that’s also the reason why I didn’t share code in this post, sorry again 🙏).

I really hope you are getting a clearer idea of how to structure your next micro-frontends project if not feel free to reach out, so I can have food for thoughts for the next post! ✌️

Micro-frontends, the future of Frontend architectures

Micro-frontends architecture

In the past 30 months, I had the opportunity to work on one of the most challenging architectures I’ve ever designed in my career.
The main requirements were based on the speed of delivery, scalability and code quality.
Frontend applications are becoming more challenging daily and achieving those requirements in a company with a massive growth like DAZN was far to be an easy task.

The first step for me was identifying how to achieve those requirements in a meaningful manner, therefore, I started thinking how I can reach those goals in an ideal world and then work retrospectively through the constraints we had inside our company.

The speed of delivery could have been achieved parallelising tasks in multiple teams the real challenge although is having teams independent enough to not be stopped by external dependencies in particular when the teams are distributed and not co-located.

Scalability on the Frontend ecosystem is not only represented by technical challenges but mainly by autonomous teams, too often I experienced the frustration of frontend developers from external dependencies and because they have to maintain and improve a codebase started for one purpose and evolved in a monster becoming unmanageable after some months or a few years of work, ideally we should be able to scale our teams organically and adapting them to the business needs without too much friction, more than being trapped inside codebases that do not really follow the “business rhythm”.

Code Quality is a non-functional requirement that is always aimed by any team and company out there but often, despite the goodwill of each team members, due to pressure from the business, we had to make some hard decisions cutting some corners so the tech debt increases and, without being addressed properly, having a knock-out effect on the entire organization and the teams morale.

On top of those key goals, a personal one I thought was key for the project I was about to redesign was innovation, in the JavaScript community there are plenty of talented teams and individuals that are contributing to open source projects with great libraries, frameworks but more in general solutions, that could make our life easier or even accelerate the time to market of specific feature, ignoring this fantastic ecosystem would have been a technical suicide considering I was working on an architecture for the future that should have remained in the company for the foreseeable future.

For achieving all of these goals I had to think outside the box, leveraging the past experiences and the learnings from successes as well as failures happened in my career.
It’s then that I thought about micro-frontends, following the microservices principles, I was able to extract a manifesto based on what I need to achieve:

DAZN micro-frontends manifesto

Usually, when we design new architecture we need to bear in mind that architecture and technical decisions are not affecting merely the code and our technical teams but also the entire organization we work for, therefore is essential understanding the impact of those choices across our company.

If you wanna learn more, I summarise this incredible journey in this talk with my colleague Max Gallo during the last edition of Frontend Developer Love Conference, the feedback at the conference was really positive, but I decided to use this platform for understanding what other people think and create a genuine discussion around a topic that is going to change the future of our Frontend applications: micro-frontends.

Enjoy the talk and feel free to comment or ask any questions, I’d really like to gather the experience and common questions/doubts of the community around micro-frontends doing my best to answer them all.

Last but not least, if you wanna learn more on micro-frontends I warmly recommend joining me the 26th April in the 3 hours online workshop organised in collaboration with O’Reilly Media

Hapi.js and MongoDB

During the Fullstack conference I saw a small project made with Hapi.js during a talk, so I decided to invest some time working with Hapi.js in order to investigate how easy it was create a Node.js application with this framework.

I’ve to admit, this is a framework really well done, with a plugin system that give you a lot of flexibility when you are creating your server side applications and with a decent community that provides a lot of useful information and plugins in order to speed up the projects development.

When I started to read the only book available on this framework I was impressed about the simplicity, the consideration behind the framework but more important I was impressed where Hapi.js was used for the first time.
The first enterprise app made with this framework was released during Black Friday on Walmart ecommerce. The results were amazing!
In fact one of the main contributor of this open source framework is Walmart labs, that means a big organisation with real problems to solve; definitely a good starting point!

Express vs Hapi.js

If you are asking why not express, I can reply with few arguments:

  • express is a super light and general purpose framework that works perfectly for small – medium size application.
  • hapi.js was built on top of express at the beginning but then they move away in order to create something more solid and with more built in functionalities, a framework should speed up your productivity and not giving you a structure to follow.
  • express is code base instead hapi.js is configuration base (with a lot of flexibility of course)
  • express uses middleware, hapi.js uses plugins
  • hapi.js is built with testing and security in mind!

Hapi.js

Let’s start saying working with this framework is incredibly easy when you understand the few concepts you need to know in order to create a Node project.

I created a sample project where I’ve integrated a mongo database, exposing few end points in order to add a new document inside a mongo collection, update a specific document, retrieve all documents available inside the database and  retrieving all the details of a selected document.

Inside the git repo you can find also the front end code (books.html in the project root) in Vanilla Javascript, mainly because if you are passionate about React or Angular or any other front end library, you’ll be able to understand the integration without any particular framework knowledge.

What I’m going to describe now will be how I’ve structured the server side code with Hapi.js.

In order to create a server in Hapi.js you just need few lines of code:

let server = new Hapi.Server();
server.connection();
server.start((err) => console.log('Server started at:', server.info.uri));

As you can see in the example (src/index.js) I’ve created the server in the first few lines after the require statements and I started the server (server.start) after the registration of the mongoDB plugin, but one step per time.

After creating the server object, I’ve defined my routes with server.route method.
The route method will allow you to set just 1 route with an object or several routes creating an array of objects.
Each route should contain the method parameter where you’ll define the method to reach the path, you can also set a wildcard (*) so any method will be accepted in order to retrieve that path.
Obviously then you have to set the route path, bear in mind you have to start always with slash (/) in order to define correctly the path.
The path accepts also variables inside curly brackets as you can see in the last route of my example: path: ‘/bookdetails/{id}’.

Last but not least you need to define what’s going to happen when a client is requesting that particular path specifying the handler property.
Handler expects a function with 2 parameters: request and reply.

This is a basic route implementation:

{
   method: 'GET',
   path: '/allbooks',
   handler: (request, reply) => { ... }
}

When you structure a real application, and not an example like this one, you can wrap the handler property inside the config property.
Config accepts an object that will become your controller for that route.
So as you can see it’s really up to you pick up the right design solution for your project, it could be inline because it’s a small project or a PoC rather than an external module because you have a large project where you want to structure properly your code in a MVC fashion way (we’ll see that in next blog post ;-)).
In my example I created the config property also because you can then use an awesome library called JOI in order to validate the data received from the client application.
Validate data with JOI is really simple:

validate: {
   payload: {
      title: Joi.string().required(),
      author: Joi.string().required(),
      pages: Joi.number().required(),
      category: Joi.string().required()
   }
}

In my example for instance I checked if I receive the correct amount of arguments (required()) and in the right format (string() or number()).

MongoDB plugin

Now that we have understood how to create a simple server with Hapi.js let’s go in deep on the Hapi.js plugin system, the most important part of this framework.
You can find several plugins created by the community, and on the official website you can find also a tutorial that explains step by step how to create a custom plugin for hapi.js.

In my example I used the hapi-mongodb plugin that allows me to connect a mongo database with my node.js application.
If you are more familiar with mongoose you can always use the mongoose plugin for Hapi.js.
One important thing to bear in mind of an Hapi.js plugin is that when it’s registered will be accessible from any handler method via request.server.plugins, so it’s injected automatically from the framework in order to facilitate the development flow.
So the first thing to do in order to use our mongodb plugin on our application is register it:

server.register({
   register: MongoDB,
   options: DBConfig.opts
}, (err) => {
   if (err) {
      console.error(err);
      throw err;
   }

   server.start((err) => console.log('Server started at:', server.info.uri));
});

As you can see I need just to specify which plugin I want to use in the register method and its configuration.
This is an example of the configuration you need to specify in order to connect your MongoDB instance with the application:

module.exports = {
   opts: {
      "url": "mongodb://username:password@id.mongolab.com:port/collection-name",       
      "settings": {          
         "db": {             
            "native_parser": false         
         }
      }    
   }
}

In my case the configuration is an external object where I specified the mongo database URL and the settings.
If you want a quick and free solution to use mongoDB on the cloud I can suggest mongolab, when you register you’ll have 500mb of data for free per account, so for testing purpose is really the perfect cloud service!
Last but not least, when the plugin registration happened I can start my server.

When I need to use your plugin inside any handler function I’ll be able to retrieve my plugin in this way:

var db = request.server.plugins['hapi-mongodb'].db;

In my sample application, I was able to create few cases: add a new document (addbook route), retrieve all the books (allbooks route) and the details of a specific book (bookdetails route).

Screen Shot 2015-12-04 at 23.44.38

If you want to update a record in mongo, remember to use update method over insert method, because, if correctly handled, update method will check inside your database if there are any other occurrences and if there is one it will update that occurrence otherwise it will create a new document inside the mongo collection.
Below an extract of this technique, where you specify in the first object the key for searching an item, then the object to replace with and last object you need to add is an object with upsert set to true (by default is false) that will allow you to create the new document if it doesn’t exist in your collection:

db.collection('books').updateOne({"title": request.payload.title}, dbDoc, {upsert: true}, (err, result) => {
    if(err) return reply(Boom.internal('Internal MongoDB error', err));
    return reply(result);
});

SAMPLE PROJECT GITHUB REPOSITORY

Resources

If you are interested to go more in deep about Hapi.js, I’d suggest to take a look to the official website or to the book currently available.
An interesting news is that there are other few books that will be published soon regarding Hapi.js:

that usually means Hapi js is getting adopt from several companies and developers and definitely it’s a good sign for the health of the framework.

Wrap up

In this post I shared with you a quick introduction to Hapi.js framework and his peculiarities.
If you’ve enjoyed please let me know what you would interested on so I’ll be able to prepare other posts with the topics you prefer.
Probably the next one will be on the different template systems (handlebars, react…) or about universal application (or isomorphic application as you prefer to call them) or a test drive of few plugins to use in Hapi.js web applications.

Anyway I’ll wait for your input as well 😀

2015 the birth of London JS community

We are very close to the end of 2015 and it’s time give a look back to the first 11 months of this year understanding what I’ve accomplished and trying to get some resolutions for the new year as well!

2015 for my professional life  was a year of changes: I moved to a new job, I learnt new programming paradigms (reactive and functional programming), I met a lot of incredible and talented  people and many many other things.

Probably the biggest changes (or old loves?) are the creation of London JavaScript community and my returning as speaker on technical talks after a couple of years of inactivity.

Last May I started a new adventure creating a new JavaScript community in London; I spent a month to understand how and why I could do that properly.
I had the possibility in the past to be staff member of the largest Actionscript Italian community and it was really a great experience.
I was young, with a lot of passion, not much experience and the community was the perfect place for growing properly, meeting new friends, learning from the different people, trying to solve technical puzzle everyday and having fun why not!

Starting again this experience in a new country it was a real challenge for me, but this time, with way more experience than the first time, clear ideas and a touch of madness.

In 2013 I had the opportunity to spend few months in Silicon Valley and I went to several meetup events and conferences from San Francisco to San Jose.
What I was really impressed of that environment was for sure the vibe I was able to breathe in any of these events.
People from all over the world that help each others, facilitating the connections between individuals, creating opportunities and sharing knowledge.
I was astonished about this way of doing community and when I moved from Italy to London I spent the first 18 months going to different events trying to retrieve the same experience and vibe.

When I started the London Javascript community my main goal was definitely recreating that vibe in this great city where the best developers all over the world are working in interesting projects with a lots of challenges to solve.
That’s why I decided to do that, filling a gap present in London communities where there were many and strong vertical framework communities (like React and Angular one), but not a strong and general JavaScript community.

After 8 months I’ve to admit I’m very happy about the results that this community was able to generate:

  • ~1400 members
  • 7 live events
  • 1 code lab for half day
  • 2 webinars
  • an average of 60 people per event
  • Listed as O’Reilly Community partner, Google Community and Skillsmatter Community
  • Community Partner of great events like: FullStack conference and Dot.JS conference
  • more than 1900 tweets & retweets with more than 500 followers

I had also the opportunity to meet great speakers, amazing developers and passionate people.

What this community is giving me back is really invaluable and really hard to find in similar activities too, I’m really grateful of any single moment spent organising any event.

What about the resolutions for 2016?

Recently I started to gather the interest from several companies that are asking me to organise meetup events in their offices and that means all the hard work done is paying this community back!

I contacted few speakers from California and next year I’m organising a couple of webinars with speakers from Silicon Valley and directly from Google office in Mountain View.

I’m already in contact with few great speakers ready to share with the community tips and tricks on different topics like webpack, jspm, angular, webrtc, react and ES6! Keep an eye on the community page in order to discover more about these events.

Last but not least, I’m working right now on the official community website that will be a SPA website with socials integration and the possibility to subscribe to a technical newsletter where I’m going to share the best articles, tutorials and events on the web.

Obviously these are already in the roadmap but I’m really open to listen what the JavaScript community is looking for! So don’t waste this opportunity and share your ideas on how to grow and make more special OUR community!

ES2015 Destructuring assignment: by value or reference?

This week I’ve organised a meetup on ES2015 in my community, where the speaker presented his favourite features of the language.

Right after the talk I had a chance to talk with my best friend that was asking if destructuring assigns the values copying the value to the new variable or instead by reference if you work with Object or Array.
Because I hadn’t a change before to work with this new ES2015 feature I did a quick example just to get an answer to this question.

It looks like destructuring feature works by reference and it’s not copying the value.
That means anytime you’re going to change a value inside a variable that contains an Object or Array assigned via destructuring, also the original Object or Array will be affected as you can see in this simple example: destructuring example ES2015

destructuring ES2015

So when you work with destructuring bear in mind to pay a lot of attention when you change a value inside your destructured Objects and Arrays!

HaXe, my new toy!

After Adobe MAX 2011 everything should not be the same for me and maybe for a lot of flash platform developers around the world, Adobe brings some “directions”  that didn’t find my consent mainly for the way that communicate these news and the impact that had in the market, but we know that Flash Platform is not dead and it will go ahead for many years.
Obviously nothing was the same after that, in fact many developers started to look around for new technologies and frameworks like Backbone.js, Sencha Touch, Ext JS and so on.
Personally I started to checked in last few months many Javascript frameworks because my aim was find something that could replace Flash Platform in the future and I have to spend time in next years to consolidate it and go ahead with Flash Platform too.
Last week a big friend of mine gave me this link: http://www.haxenme.org/ and when I started to read what you can do and how you can do it, I immediately started to go in deep with HaXe in my spare time and trust me that I had a lot of fun!

First of all what is HaXe?
HaXe is an open source multiplatform programming language, it allows to write once and deploy everywhere (in the right meaning of therm “everywhere”).
In fact with HaXe we can write in a programming language similar to Actionscript 3 (strictly typed, OOP, …) but more powerful (it has enum, generics, dynamic type, …), with HaXe we can target our projects for Flash, C++, Neko, HTML5, Node.JS, PHP, iOS, Android… if we work with multiplatform APIs we can write once and deploy our project for multiple targets.
So for many developers that come from Javascript, Actionscript, Java and so on, will be so easy to start deal with HaXe.
Another interesting thing of HaXe is that we can work with the library present in the SWF files and integrate movieclip in our project, we can create also SWF file without Flash Professional with SWFMill that is used for the generation of asset libraries containing images (PNG and JPEG), fonts (TTF) or other SWF movies.
That’s so interesting because it means that designers that usually prepare assets for developers don’t need to change own daily workflow!
If you need to extend your target platform we can add new features with external libraries, it’s so important because we can really cover everything with this feature; we can find a lot of ready to use libraries directly on the lib HaXe website.
With HaXe you can communicate between different languages like JS and Flash in both direction, you can easily find many frameworks and library porting in HaXe, for example javascript like JQuery, Sencha Touch, Node.JS and so on.

What about the IDE to work with HaXe (so important for a developer!)!?
On Mac you can use TextMate or FDT on Win FDT or FlashDevelop this one seems the best one but I didn’t try it. For more specs I suggest to take a look at HaXe site section, maybe you can find your favorite IDE in the list.

Finally I made an easy sample to understand better the powerful of HaXe NME, this sample loads an external XML file and an external SWF library with a movieclip inside exported for Actionscript, so I added a drag&drop feature to the list. Then I tried to compile it for iOS, Mac OS X Lion, C++ and SWF with the same basecode and everything work so well and smooth!


You can download source files here, to compile it take a look at HaXeNME section and you can find everything you need to try this sample and start to play with HaXeNME!

If you want to deal with HaXe, I suggest two books, the first one is really a good start to work with this fantastic language:
HaXe 2 beginner’s guide
Professional HaXe and Neko

Last but not least, next April in Paris there will be World Wide HaXe conference, I’ll be there to learn more about the future of this amazing platform if you are planning to be there it will be a pleasure for me catch up for a beer!

I hope soon to publish more experiments and informations about HaXe because it is a thrilling programming language!!!
So stay tuned!

Review: HTML5 Mobile Web Development

A couple of weeks ago I became blogger reviewer for O’really, so I take this opportunity to open my mind and learn new stuff about new technologies, programmation languages, etc.

So this is my first review and I start with an HTML5 video course.
Why am I talking about HTML5 in this blog? Because I think it’s important to know and learn if it could be useful in some projects or not.

Starting with this idea I’ve decided to watch this video course about HTML5 on mobile development.
Video courses aren’t my favorite media to learn new stuff because I love to sign my books, add some notes…you know what I mean… but this time I was really impressed about how O’Reilly organized it.
Seems you are in a real classroom with teacher in front of you that show code examples, tips & tricks using HTML5, CSS3 on iPad or iPhone.
Course is focused on mobile development, Jake Carter, the author, shows also Android world, how to configure your computer to work with emulator and simulator for Android, iPhone and so on.

I really love the way that he works in the classroom because first of all he explains the powerful of a particular feature, then show how to implement it and finally a little part of Q&A from internet people (I suppose).
During this video course you can learn useful stuff, take a look at table of contents in O’reilly website.
It was my first time with HTML5 and I think is an interesting technology, in particular, during this course I learn how to work with geolocation,  with JS and Canvas, with audio and video API and again how to save data directly on the device in a database.
I appreciate a lot al meta and css dedicated to iPhone and iPad, very useful.
Finally if you are interesting to learn a new way to develop on mobile, I suggest to take a look at this reference.
It’s useful, easy and I think is a fast method to learn.