Identifying micro-frontends in our applications

I’ve always spent a lot of time reading, attending conferences, researching different topics and those learnings really helped me shape my career, one of them is definitely Domain Driven Design (DDD).

Let’s take a step back first, why am I talking about DDD?

One thing that always puzzled me in this industry is the lack of learnings from different technology communities, for instance, we can find quite a lot food for thoughts when we examine the principles behind microservices more than focusing on the bare implementation.
On the backend side, there are often practices, methodologies, more in general ideas, that are totally applicable on the frontend too, but often we don’t think how to do it.
Often just taking a step back, understanding why someone implemented a pattern over another, allows us to open up a world of opportunities that we would never think about because “it’s not the standard way to do things”.
Contaminations from different industries or technologies allow us to see the world from a different perspective, creating new possibilities not explored enough (or at all sometimes), giving us the possibility to apply concepts and mental model to our day to day work.

DDD key concepts

Ok, now we can explain why DDD is mentioned in a post where I talk about micro-frontends.
DDD brings on the table some of the key concepts for defining a micro-frontends because it helps our organisation to align the business with the tech side, unifying de facto 2 main areas of our companies: product and tech.
DDD starts with the idea of identifying parts of our application that represents a subdomain of the final application.
Usually, an application is focused on a core domain, for instance, Netflix core domain is streaming movies anywhere at any time, considering the domain is usually a complex proposition, DDD suggests to split the domain into multiple subdomains allowing a company to understand how to structure the company as well as the project.
Some examples of subdomains could be the authentication, customer support inventory management and so on.

Subdomains are divided into 3 categories:

Core Subdomains: those are the main reason why an application should exist, core subdomains should be treated as a premium citizen in our organizations because they are the ones that deliver values above anything else
Supporting Subdomains: subdomains related to the core ones but not key differentiators, those subdomains could support the core subdomains but at the same time are not essential for delivering the real value to our users
Generic Subdomains: those are needed subdomains used for completing the platform and often the companies decide to go with off the shelf software because not strictly related to their domain, for instance, authentication or payments management, more in general anything that is not related to our code business

Inside each subdomain, tech and product teams should identify a ubiquitous language, or rather a way where business meets tech using the same language for identifying functionalities, objects but more, in general, the domain model.

Think about it, how often we speak with a product owner that defines part of an application in a completely different way from the techies!

Ubiquitous language is not a static language, should evolve with the business and the applications running alongside it.
In this way, we would be able to define a domain-model similar to what we discuss day to day with the domain experts, constantly up-to-date.
Let’s take Netflix for instance, I think we are all familiar with this famous streaming platform, a subdomain of Netflix might be the catalogue, inside it we can identify multiple areas with specific functionalities, those could be directly connected to backend APIs related to a subset of the entire application.
In Netflix case, they are using Backend For Frontend pattern (BFF) nevertheless the principles remain the same.

Netflix web platform

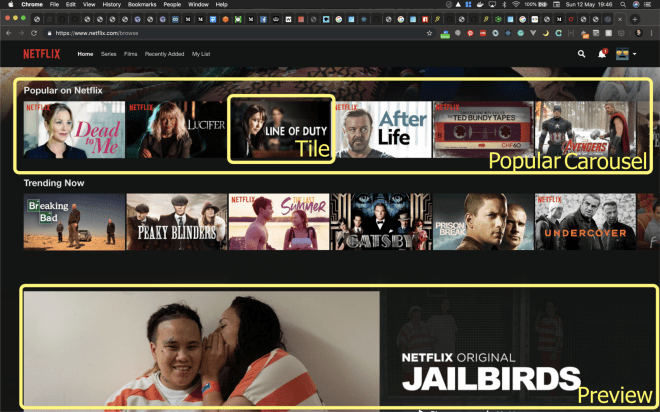
In this screenshot, we can identify some components, those might be linked to some microservices like the personalisation service, the catalogue per country, the most popular contents and so on.
Despite the technical integration that could be via backend for frontend, GraphQL, Server Side Rendering and so on, the most important thing to understand is that those areas are all linked to the same subdomain.

Therefore those microservices, as well as the frontend, should be encapsulated in a unique subdomain with its own ubiquitous language.

Following just an example to understand what a subdomain should contain:

An example of subdomain based on the Netflix platform

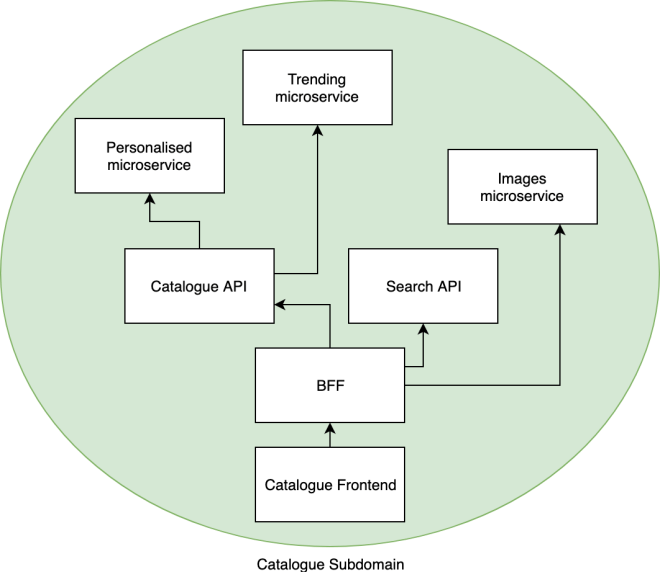
This is a fundamental step for identifying how to “slice” our application, understanding that the frontend is part of the subdomain allows us to think holistically about our web application.
If we then extend the concept to the infrastructure too, we finally see all the components for developing a subdomain in the hands of a team that can own Frontend, Backend and Infrastructure end to end without too many external dependencies.

Up to now, DDD was applied to the backend layer but not very often to the frontend as well, extending these concepts to the frontend allow us to easily identify our micro-frontends.
I’d like to highlight another important concept, a subdomain cannot (and shouldn’t) be recognised as a component in a page, it’s true that in each UI we can find links or graphical elements related to different subdomains but at the same time we need to understand that they are not standalone identifying a subdomain and they need to have teams owning a subdomain end to end as we are going to see in the next few paragraphs.

Identifying a micro-frontends bounded context

Following the DDD principles, identifying a micro-frontend becomes quite trivial.
Usually, there are 2 main scenarios to deal with on a day to day based: greenfield projects, usually very exciting for any developer but also more complicated because we don’t have real information about our user base and how they would consume our content; legacy projects, where we have a tons of information (if we have diligently tracked our users behaviours using Google Analytics or similar tools) and therefore it’s easier to rationalise a logical identification of bounded context across the entire platform following our users’ behaviours

Having data to consult is one of the best situations we can aim for, understanding the users’ behaviours allow us to easily identify the subdomains of our applications.
Let’s assume we see a huge amount of traffic consulting the landing page, then 70% of those users are moving to the authentication journey (sign in, sign up, payment…), from here only 40% of the traffic subscribes to a service or use their credentials for accessing the service.

Users’ behaviours example in an application

Those are good indications about our users’ behaviours in our platform, DDD would suggest starting from the domain model of our application identifying the subdomains and their related bounded context and having behavioural data supports us on how to “slice” the frontend applications,

Users’ behaviours are invaluable for identifying our micro-frontends.

In the example discussed before, if we think about the technical implementation, allowing 100% of our users downloading only the code related to the landing page will allow them to have a faster experience because they won’t download the entire application immediately and the 30% of users who won’t move forward to the authentication area will have just enough code downloaded for understanding our service.
Obviously, mobile devices with slow connections can only benefit from this approach for multiple reasons: less KB to download, less memory used, less Javascript to parse and execute and a faster first interaction of the page.

Greenfield projects are a bit more complicated to manage, identifying micro-frontends upfront without knowing how our users interact with the platform could result in bad experiences but nevertheless, we have to find a way for structuring our micro-frontends architecture.
In this case, working closely with the product team or the subject experts could make a huge difference.
In my experience, any startup or medium-large organization have always a team or a person that has a clear idea of how the platform should behave, that knows inside out the core domain of an organization.
This person or team is key for understanding how the user should behave and therefore how to identify the domain model of our application as well as our micro-frontends.

It’s essential to understand that a subdomains evolves with the business, never assume that is immutable!

In DAZN we have decided to split our Single Page Application into multiple subdomains based on the data retrieved in the past years, ending up with 5 different micro-frontends with a few components developed by external teams and embedded as dependencies in one micro-frontend.
We identified the following micro-frontends:

. Landing page
. Authentication
. Catalogue
. Playback
. Sports data
. User account
. Help
. Chat

For instance, Playback and Sports Data are components living inside the catalogue micro-frontends, the complexity of those 2 subdomains lead us to assign a team dedicated to each of those subdomains.
Those components are published in an NPM private repository and are treated as an external dependency for the catalogue micro-frontend.
All the others are SPAs or single pages loaded by our client side orchestrator.

The power of local decisions

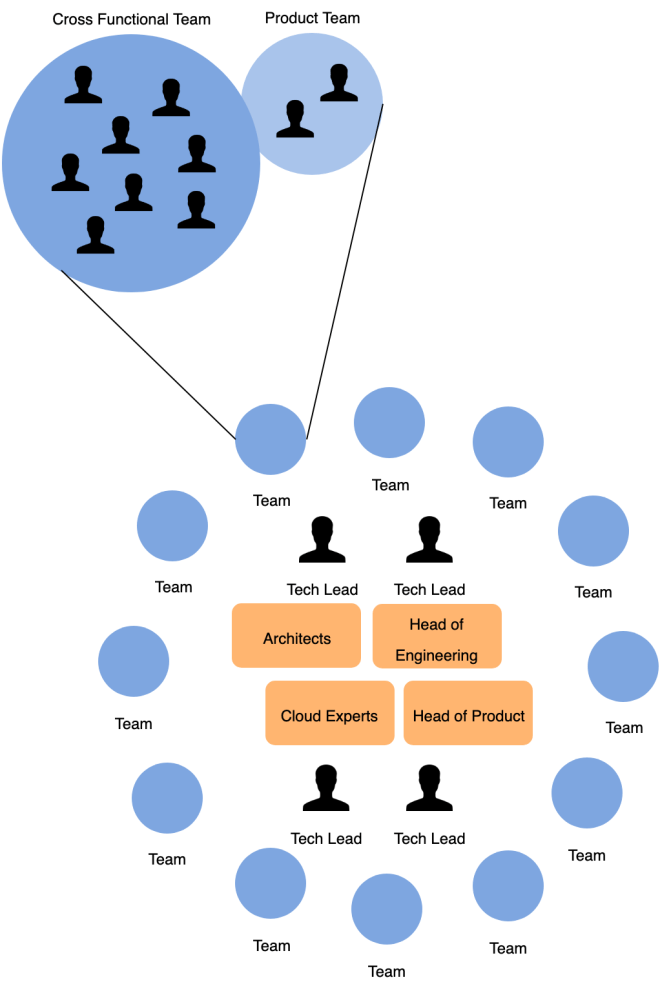
Working with subdomains allow us to assign a team to a specific area of our application, now stop for a moment and think how powerful could be this concept…
One of the key thing that I’ve always envy to startups is how fast they are capable to move and how quickly they take decisions on architecture, design or UX even.
When they need to take a decision, it’s a matter of minutes or hours but not weeks like in large organizations where we need to have a quorum of people agreeing on the solution.
If we think even further, a startup can react very quickly because they can take local decisions, in their case a local decision is a company decision, but if we extend this concept to medium-large organizations, dividing an application by subdomains allow us to have “multiple startups” inside an organization, therefore, empowering a team to take local decisions will allow to speed up the delivery, reduce the frustration and brings on the table interesting concepts like independent builds and deployments, less external dependencies, less frustration and more innovation.
The outcome of using DDD for identifying a ubiquitous language and subdomains would be creating a cross-functional team composed by frontend developers, backend developers, manual QAs and dev-in-test working closely to their product team/subject expert and being able to take a wide range of local decisions, from product decisions to infrastructure decisions, being responsible of the subdomain end to end.

Obviously, this team cannot (and shouldn’t!) be compared to a remote island where any decision is taken locally, these teams have to collaborate with the rest of the organization using services like architects, cloud experts and other functions inside the organization following the boundaries created by the heads of the technical department.

Organization example where each team represent a subdomain

In the past years, I read a lot about DDD and I found an interesting box inside Domain Driven Design Distilled book that caught my attention and I think is worth to share in this post to enforce the concepts explained in this paragraph:

Bounded Contexts, Teams, and Source Code Repositories

There should be one team assigned to work on one Bounded Context. There should also be a separate source code repository for each Bounded Context. It is possible that one team could work on multiple Bounded Contexts, but multiple teams should not work on a single Bounded Context. […]

It is especially important to be clear that one team works on a single Bounded Context. This completely eliminates the chances of any unwelcome surprises that arise when another team makes a change to your source code. Your team owns the source code and the database and defines the official interfaces through which your Bounded Context must be used. It’s a benefit of using DDD.

from Domain Driven Design Distilled — chapter 2

5 suggestions for dividing your frontend monolith

Last but not least, I think would be helpful having some takeaways of this post based on my experience and what I saw so far:

  1. Gather data: if you have a legacy project you can use Google Analytics or similar services for understanding how your users are interacting with your application, you will find a clear idea how your user base is interacting with your application.
    For greenfield projects, engage with your product team or customer, add GA or similar tools in your web application and via data validate the initial assumptions. Remember, bounded context and subdomains evolve with your business, are not defined once and set in stone!
  2. Talk with the domain experts: invest time with your product team or the domain experts in your company, understand their point of view, their roadmap, how they think to evolve the project, those are vital information for identifying the micro-frontends
  3. Review the teams organization: don’t fall in the trap of defining once the teams and don’t change them anymore, teams, like your business, should be fluid, if you see that following DDD there are some teams crossing multiple subdomains, make the bold decision reviewing the internal organization, the entire business will benefit from it!
  4. A micro-frontend could be a single page or a SPA or SSR: as long you are following DDD for identifying your subdomains, a micro-frontend may end up to be represented by a single page like in the case of a landing page, or a more complex solution based on a Single Page Application architecture or a Server Side Rendering one.
    Components risk being not representative of a subdomain because tightly linked to the container where they are nested, therefore the overlap of multiple contexts could cause more issues than benefits.
  5. Invest the right amount of time at the beginning of your project: designing an architecture upfront is not the best way for starting a project, usually an architecture should work iteratively, therefore we should start designing “just enough” and slowly but steady we enhance the design based on additional information we found engaging with the product team, developers and users.
    When you are identifying the different subdomains of your application invest enough time because this decision could impact how to structure the tech teams as well as how much communication overhead your company is going to spend due to dependencies between teams

A night experimenting with Lit-HTML…

This morning during my commuting time I read a post on Lit-HTML and this templating library intrigued me at the level that I needed to experiment as soon as possible, so I took a night off because I was curious to see this new approach in action.


DISCLAIMER: If you are an expert on Lit-HTML I beg you pardon if I didn’t report all the latest on lit or some information in this post are not up to date 😅 but if you are a curious like me 🤠, you may have found the right place understand what Lit-HTML is and why I was excited to try it 😇.


What is Lit-HTML?

Lit-HTML is a blazing fast template library that will be used for the new version of Polymer (v 3.0), it was presented during last Chrome Dev Summitin San Francisco and I warmly suggest to invest ~30 mins of your time watching the following talk for getting an idea of the library:

If you don’t have 30 mins right now here a summary of what lit-HTML is doing.

Lit-HTML doesn’t use Virtual DOM like the latest trends in many UI libraries like React or Preact for instance, but instead is using web standards to generate and update a UI component.
In fact, this library uses the <template>tag and ES2015 tagged template literals for generating a DOM node.
With this approach, lit-HTML is capable to analyse the template literals and update only the mutable part maintaining the static bit unchanged increasing the render performance compared to the virtual DOM approach.

To provide an idea of how lit-HTML differs from a VDOM library I created these animations so you can immediately see the work done by one and the other library for updating a DOM node value and an attribute:

with Preact (or React, both behave in the same way):

with lit-HTML:

As you can see, lit-HTML heavily optimise the updates just recalculate what effectively should be re-rendered instead of re-rendering the entire node, this behaviour is highlighted in the first h1 tag of our example: Preact is re-rendering the entire node including the text that is static by design (“Preact” word was static, the number instead is a random one I used for causing a DOM update), instead lit-HTML splits the string in what is static and what is not so it can update ONLY what potentially could change without the need of re-rendering anything else.

If you are wondering what is the black magic behind lit-HTML, I can summarise it in this way: JUST WEB STANDARDS!
Surprisingly enough, lit is not using anything too complicated but just web standards, when we define a template to render with lit-HTML we write a component like that:

As you can see it’s just a function returning a tagged template literal, the tag correspond to the word html provided by lit-html library.
Tags in templates literals have the characteristic to manipulate the template before being returned, in fact the tag is usually a function that is intercepting the output of a template literal before being returned.
The html tag, provided by lit library, is analysing the template before returning it to the render function used for updating the DOM, if we output on console how our template becomes before being rendered, we can see that the html tag is performing an analysis for dividing what is static, what is dynamic and creates an array of raw data:

For benchmarking lit-HTML, I created a simple test with some random HTML elements updated every 500ms.

Looking at the performances, the node values or attributes update or the subtree update inside a template is incredibly fast compare to the VDOM approach.
This is noticeable also with not nested components like the ones above, I run several tests on them and this is the outcome:

These data are reporting how long did take on the average of several DOM updates.
We can see in the image below that sometimes Lit-HTML was even faster than the values inside the table and sometimes a bit slower, but comparing with Preact (and also React because I tried both), Lit-HTML is really consistent time wise, the discrepancy between an update and the other is really small.
Lit-HTML is definitely loosing against Preact or React on the first time render, in fact I noticed that Lit-HTML is on the average 60–70% slower just for the first few renders, after that is blazing fast compared to the VDOM one.
Also, after 10-15 mins of keeping the test up and running, I noticed the 2 components weren’t on sync anymore and apparently the Preact one was a tick behind the lit-HTML one.

It’s worth mentioning how I was able to retrieve these values so you can try your own tests as well if you like.
After creating a Preact and a Lit-HTML component, I used the performance APIs in the following way:

  • Before returning the html to render I added the starting mark with the following code:
    performance.mark('litStarts’)or performance.mark('reactStarts’)
  • Then, using the MutationObserver object I observed every change to characterData, childList or subtree calculating the time it took to update the DOM with the final mark andmeasure method from performance APIs:

Let’s observe now how a lit-HTML component is created, the 2 essential parts are the html tag used or analysing the template literal and the render method used for updating the DOM, this is a simple lit component:

The render method has to be called every time there is a template update, in order to do that we can create our own logic via setInterval or requestAnimationFrame or any other way will trigger the render method after changing a value inside the template (proxy or reactive programming could be other 2 interesting methods to try).
A more in depth explanation could be find reading this article: A bit about Lit-html rendering.

Luckily, lit-html is integrated in the next version of Polymer (v3.0) therefore we won’t need to spend much time wrapping this template engine inside custom code for creating our components library.
Bear in mind, as highlighted in the Polymer repo, LitElement is not ready yet for production but we can start experimenting with it.

LitElement is currently in development

Considering Lit-HTML is a standalone template library, if you are not comfortable on using polymer you can always create your own components library 🤩🤟 and integrate it with your favourite state management!

Other online resources

Before finishing this quick article, I thought would be useful sharing additional resources for understanding a bit better lit-HTML, hopefully you will find them useful

HTTP2: the good, the bad and the ugly

I spent last few weeks investigating on HTTP2, the successor of HTTP1.1 and I’d like to share my findings and thoughts in this post.

Let’s start saying that if the question you have in mind at this point is: “Can I really use it today, not only for experiments but also in production?”
My answer would be: “YES, you can!”

First of all, I’d like to share with you the browsers implementation status for this protocol

screen-shot-2016-09-06-at-23-00-23

As you can see from the screenshot taken from caniuse.com it’s definitely well supported on the latest version of the major browsers with some caveats obviously.

If you are not convinced yet, please check this website with one of the browsers that currently supports HTTP2 and look how fast to load is!
I’d suggest to install the HTTP2 indicator Chrome extension to discover how many web apps or online services are using this protocol:

screen-shot-2016-09-07-at-21-41-09

Not yet convince?! OK let’s move to a deeper analysis then!

HTTP2 is a binary protocol with a multiplexing requests method implemented, that means all the browser requests will be handled asynchronously.

This massive change will increase drastically the performance of your application.
Considering at the moment a browser can download simultaneously a maximum of 5 resources per domain (let’s avoid talking about “resource sharding” for now), with HTTP2 we will be able to request all the resources and render them when the browser will accomplish their download, check this demo made with Go Lang for a proper comparison between the 2 protocols and check also the Network panel in the Chrome Dev Tools or Firefox dev tools in order to understand how the 2 protocols differ.

The Good

HTTP2 has really few rules in order to be implemented:

  • it works ONLY with https protocol (therefore you need a valid SSL certificate)
  • it’s backward compatible, so if a browser or a device where your application is running, don’t support HTTP2 it will fall back to HTTP1.1
  • it comes with great performance improvements out-of-the-box
  • it doesn’t require to do anything on the client side but on the server side for a basic implementation
  • few new interesting features will allow to speed up the load of your web project in a way that is not even imaginable with HTTP1.1 implementation

Despite the short list, HTTP2 is bringing a substantial change to the internet ecosystem.
One of my favourite feature is the server PUSH where a server can pass a link header specifying what the browser should download in advance before starting to parse entirely the HTML document.
In this case, we can educate the browser to download several resources like images, css or even javascript files before the engine recognise them inside the DOM, providing a better user experience to our web apps and/or games.

The Bad

There is still plenty of works to do in order to have a great penetration of this protocol, few specs are still on going (read the next paragraph: the ugly) and probably it will take quite few months before we will see a lot of services moving to this new protocol.

A part from the high level overview of the downsides, let’s look what will change on the technical side.

Considering that HTTP2 is not restrict on the amount of requests a browser is doing in order to download resources few techniques for optimising our websites will need to be reviewed or even removed from our pipeline.
Delivering all the application inside a unique javascript file won’t have any benefit with HTTP2, so we need to move our logic downloading only what we need when we need it.
Knowing that downloading large files won’t be a problem we could use sprites instead of several small images to handle the icons of our website.
Probably the different tools like Grunt, Gulp or Webpack will need to review their strategies or update their plugin in order to provide real value to this new project pipeline.

The Ugly

Google Chrome protocol implementation!
Chrome is my favorite browser and I use it extensively, in particular, when I need to debug a specific script or I need to gather metrics from a specific behavior of a web app.
At the moment it’s the only browser that requires HTTP2 server negotiation via ALPN (Application-Layer Protocol Negotiation) that basically is an extension allowing the application layer to negotiate which protocol will be used within the TLS connection.

Considering that OpenSSL integrates ALPN only from version 1.0.2, we won’t be able to enable HTTP2 protocol support for Chrome (from build 51 and above) if we don’t configure our server correctly.
For instance, on Linux OS, only Ubuntu from version 16.04 has that OpenSSL version installed by default, for all the other major Linux version you will either install the newer version manually or you’ll need to wait for the next major OS release.

I’d suggest reading carefully the article that describes this “issue” on ngnix blog before you start to configure your server for Chrome.

Wrap up

HTTP2 is not perfect and probably is not supported as it should be but, definitely, could improve (drastically in certain cases) your web project performance.
A lot of “big players” are already using HTTP2 protocols in production (Instagram, Twitter or Facebook for instance) and the results are remarkable.

Why not starting catching up with the future today?

Automate, automate and automate!

Recently I’ve spent several days on find the best way to set up an automation process for Javascript developers and I investigated several tools strictly related to the Javascript world.
These tools allow you to save a lot of time when you perform repetitive and sometimes boring tasks in order to test your HTML5 game, website or web app.
In this post I’d like to share with you what tools I’ve found and used to create a full-stack Javascript automation pipeline for any front end developer or team.

Let’s see what a Javascript developer or a team could automate in their machine to have a better code quality and to save a lot of time when they are working on their own library or projects.
For this purpose, in my pipeline, I’ve used different CLI tools like mocha, grunt, yeoman, blanket or plato.
Each of this tool allows you to perform a specific task but combined all together these tools will provide in your projects:

  • tdd, bdd and unit test
  • code coverage
  • dependencies management
  • (custom) project template
  • static analysis
  • tasks automation (live reloading, deploy in localhost folder, files concatenation…)

These are only few of the multiple options that you can have “playing” with these tools, but let’s try to go a little bit more in deep to see what tool can effectively help to accomplish each of the item present in the list above.

TDD, BDD and UNIT TEST

Surfing on the web about this topic on Javascript you’ll find really a lot of good libraries, the one I decided to use is Mocha because is very well integrated with Blanket (code coverage) and karma (tests runner) and because it’s based on node.js so you can create your libraries and then testing in pure javascript without any need to pass through HTML pages and if you need to test javascript code that will run only inside the browser you could fake the window object with libraries like jsdom integrated in your test cases.
Mocha allows you to work in BDD, TDD and in Unit Testing you can easily mix with several assertion libraries and writing also async tests became really really easy.
Other libraries that could be useful could be Jasmine or QUnit.

CODE COVERAGE

As I wrote before I found an interesting library that work perfectly with Mocha that is Blanket.js.
Blanket is very simple and easy to use library in particular when you have all your test written in modules (node.js style) instead of a mix between html and js files.
Blanket works not only with Mocha but also with Jasmine and QUnit, so basically with the most famous testing libraries!
One thing that I really appreciate of blanket is the final output that could be exported in an interactive HTML where immediately you can recognise what it’s not tested yet and jump from a file to another one following the menu on the right side of the template.
Another one that it seems quite interesting is Istanbul.js, I didn’t try yet but it’ll be the next one for sure, I heard really good experiences from other developers with this library!

STATIC ANALYSIS

When you want to use a static analysis tool in your pipeline on of the most popular is….
But I suggest to give a try to Plato in particular if you work alone or in a small team and you want to do a sanity check of your project.

8ek3snRZ22Eq898NOi-l9Dl72eJkfbmt4t8yenImKBVvK0kTmF0xjctABnaLJIm9
Plato, in fact, store all the information of your code project locally in some JSON files and you can navigate through the report directly from an HTML page created by the tool (above a screenshoot sample).
These stats are very interesting to check the are of improvement of your project and in particular with these tools you can have an immediate feedback on where your efforts should be focused in order to deliver a better product and be sure that the maintenance shouldn’t cost too much later on.
Obviously you can also use more sophisticated solutions like SonarQube and install it inside your server with the Javascript plugin and run your static analysis every time a developer push his code in git or mercurial.
Depends always the dimension of the project and the team, my suggestion is to start with Plato in a small project and then when you see the real value move to SonarQube also if you are a small organisation.r

PROJECT TEMPLATE

When you talk about template for Javascript it’s impossible to forget of Yeoman.
Yeoman is a scaffolding tool that allow you to create skeleton of project with your favorite JS library ready to use.
I really suggest to use these kind of tools because it facilitates the beginning of new projects and give you at the same time some standards inside your company and between your projects.
There are several generators ready to use and searchable from the official website, if you can’t find what you’re looking for it’s very easy use Node.JS and the APIs already built in Yeoman to create your own generator with the functionalities that your company or projects need.

TASKS AUTOMATION and DEPENDENCIES MANAGEMENT

This is my favourite part, I found in Grunt a really good tool to automate more or less everything that is not strictly related to write the project code inside my IDE!
Grunt is the glue to assembly in a pipeline all the tools explained above, easily in one line inside your CLI: “grunt”.
The community is really huge and you can find more or less everything for Node.JS or plain Javascript, from minify, uglify and concatenate your JS files, to compile your LESS or SASS files, to convert your ES6 code to ES5, to run static analysis or push your code directly on git simply with a grunt task.
One thing that I really like of Grunt is that you can easily scale the way you are working with it using a yaml file and different js files (one per task) and assembly them at runtime.
This allows to create some common tasks for the whole company and at the same time have the freedom to add custom automation for each project and/or department of your company.
I really suggest to take a look to the official website where you can find also many technical information and then start to automate your daily Javascript workflow.
Obviously if you’re not working with JS you can still use Grunt in combination with your favourite programming language or technology like Haxe, Dart, Typescript, Coffeescript or Adobe AIR; the flexibility of this tool is really impressive!

An Alternative to Grunt could be Gulp where the main difference is that grunt favours configuration over code and Gulp exactly the opposite.
The Gulp community is growing day by day and it’s interesting to see the different approach between these two great task runners, probably in the long term the Gulp approach will be more successful but for now Grunt is exactly what I was looking for.

Conclusion

As you’ve read the JS world has got really a lot of useful tool that will save a lot of time during your daily job as developer or company.
The mix of these tools allow to create a pipeline in pure Javascript and they could really improve your code quality and your flow to have standards inside yout projects and a solid flow that will able to scale your company or projects in an easy and professional way.
Obviously there aren’t only these few tools and libraries that I’ve tried, there are many others outside there that I’d like to mention like PhantomJS or Buster or Lineman and so on, but form the next five minutes before come back on what you were doing before reading this post, try to think how to improve your flow, trust me you will remain surprise on how more productive you’ll become introducing them inside your routine.

Photoshop, Edge Reflow and Edge Inspect: the new responsive workflow

Today I’d like to talk about something that is not strictly related to development process but that it’s very useful when you are running your company as freelance or entrepreneur or if you are team leader of a team.
One of the most important thing for me when you approach a new technology is not only understand if it could fit all your needs but also understand when you introduce in your team or company how to have the best result as soon as possible.
That’s why I keep always a lot of attention on how to create a flexible and elastic workflow that allow my team to create or modify client side solutions without waste our time.
In last years we rapidly see the grow of an hot topic, strictly related to HTML5 and Javascript, like Responsive Design, so the capability to create an interface that is viewable and usable on different devices (from smartphones to web browsers for instance).
Personally, if I didn’t find anything that help my team to be immediately very productive I usually avoid to introduce new softwares in the actual workflow, but this time we are in the middle of a big revolution where HTML5 and Javascript are the main protagonists.
During last Adobe MAX I saw a couple of interesting demo on Edge “family” and I was impressed on the capability of Edge Reflow and its interaction with Photoshop CC to create user interfaces for different devices in really few time, that’s why I was really waiting to test this feature and I’d like to share with you my first experiment.

rwdTools

Photoshop CC and Edge Reflow

I think a lot of designers create the UI for a project with Photoshop, last Monday (9th September) Adobe released an update of Photoshop CC and Edge Reflow, but we start with Photoshop because the news are really cool.
One of the most boring activity for a designer (or for me when I did it as freelance :D) is to cut all images and prepare assets in different folders for the developers.
Photoshop CC helps us introducing a new feature called Adobe Generator, a new way to automate this long and tedious phase, where the designer has only to follow some simple rules on how to nominate Photoshop levels and the software automatically export all the assets for us, ready to be delivered to the developers team!
For instance if you want to export a particular level as PNG you need only to nominate the level with a PNG extension (for example: “background.png”) and run the new Photoshop command Generate > Image Assets to have all our files ready to be added on the real project.

Photoshop Generate command

To know more about Adobe Generator and in particular to know how to set the name of each level I warmly suggest to take a look to Photoshop.com where there are all the information to do that.
Another option that we have (as you can see in the image above) is the capability to export the UI structure and the assets to Edge Reflow.
If you don’t know what is Edge Reflow I explain it in few words.
Edge Reflow is a tool useful to create responsive design layout and, from yesterday, completely integrated with Photoshop CC.
In fact now you can import in Edge Reflow your layout and you can start to customise it visually for any screen resolution your project will work.

Edge Reflow

The most interesting thing is that you can export from Photoshop an Edge Reflow project, or you can synchronise in real time the changes when the 2 softwares are open.
Then you can create your layout for different resolutions only copying and paste the code generate from Edge Reflow in your favorite code IDE; I mean copy and paste for now instead of import because probably (at 99%) you’ll have to improve or change it a little bit after paste but it’s really a good step forward for a software in preview like Edge Reflow.
With Edge Reflow you can create <div> adding box elements in your layout and you can show or hide elements present in different screen resolution simply with the options in the left side of the software interface.
Another very cool thing is the capability to work with your Typekit account (integrated in your Creative Cloud subscription) to download the fonts needed in the layout made with Photoshop.

Edge Reflow and Edge Inspect

Last but not least, Edge Reflow is integrated with another cool product of the Edge family called Inspect.
Edge Inspect is a simple application that you can add as plug-in in Chrome or you can download in your iOS or Android device from the relative store, and it allows you to test in real time all the changes you are doing in a website or more in general in HTML, JS or CSS file checking in real time the final result in one or more than one device simultaneously.
This is a capability that partially missed in the flash development workflow where the mobile test was a real pain (in particular the first releases of Adobe AIR on mobile), in this case with all those new technologies Adobe decides to evolve and improve this experience giving good tools to develop.

From a developer perspective

Personally I think that the integration of a technology like Node.JS in last Adobe softwares (Brackets, Adobe Generator, Edge Reflow and so on) is giving a real boost to them, and they are opening new horizons in the desktop application field, in particular I suggest to take a look to Node-Webkit, an open source project that allow you to work with HTML5, Javascript (Node.JS obviously) and WebGL to create desktop application for different platforms.
There are many other tools that could help to achieve the same goal like TideSDK for example, but I think Node-Webkit could be very interesting if the project will be well approach by the community.

Conclusions

Demo Photoshop and Edge Reflow

Finally the big players on the market are delivering tools that allow us to create engaging and amazing experience with HTML5 and Javascript like other technologies did in the past (Flash Platform in primis).
The combination of Photoshop CC, Adobe Generator, Edge Reflow and Edge Inspect give us a real flexible and integrated workflow where in few steps we can save a lot of hours spent on the code with great results.
Obviously those tools are new and in “preview” so they are not perfect but they are stable and useful enough at this point to be integrated in the actual daily workflow giving immediately importart results.
I really hope this is the first steps to give us the freedom to create instead became crazy to have layouts working in different browsers and devices.

Isolates: how to work with multithreading in Dart

Here we are again with another topic about Dart language, first of all I’d like to start this article with an off-topic.

I joined to FluentJS in San Francisco few weeks ago, an event organize by O’Reilly focus on Javascript development, and I saw a Dart language session, the most amazing thing I’ve seen was the passion behind this project, trust me that it’s not easy today find people that believe in that way in something, Seth Ladd, the speaker and team member of Dart, gave us a great technical introduction to Dart but gave us something more, he transmitted us all his passion on Dart, really amazing!

After this quick off-topic, let’s go ahead with Isolates tutorial.

First of all, Isolates is the Dart way to work with threads and allow to take advantage of your multicore computer, but what is multithreading and when we should use it.

Multithreading

This is a good definition for me: “Multithreading is the ability of a CPU to execute several threads of execution apparently at the same time. CPUs are very fast at executing instructions. Modern PCs can execute nearly a billion instructions every second. Instead of running the same program for one second, the CPU will run one program for perhaps a few hundred microseconds then switch to another and run it for a short while and so on.” (source: cplus.about.com)

And when should we use threads?!

Basically every time you need to speed up an intensive process, for example when you have an heavy process like unzip of a big file or a for cycle with a lots of elements, you should use the threads to don’t freeze the main one and allow your user to work the interface without any issues.

Dart adds this capability in 2 different ways because, as you know you, it can export a project for Dart VM or in Javascript, with Dartium we can use the power of CPUs of your multicore computer and create different threads in each CPU where will be executed your code, in Javascript, Dart converts Isolates in web workers.

Before starting with code I decide to show in a chart how we’ll work with isolates, so basically first of all we create 2 isolates launched from the main isolate and then we pass the final informations elaborated in different isolates to the main one.

Isolates Schema

Last note, when you work with isolate you can have a sender and a receiver, so in the main isolate (launched by the application) you have a port object where you can listen when you receive informations from other isolates and you can pass the sendport object where you can send message to other isolates.

port.receive((data, SendPort replyTo){
replyTo.send("something");
});

Another important thing to remember when you work with isolates, if you need to receive messages from other isolates, is that you always set  the receiver in the main isolate, or you will n0t receive any message from other isolates because the execution of your program is not waiting for any reply without a receiver set.

I created a small project around this topic to show the powerful of the isolates, take a look here:

As you can see when I click on MONO link my CSS animation stops until to the heavy iteration is finished instead when I click on ISOLATE  link everything works well because all the iterations are accomplished in different isolates so the main one could go ahead with own job.

When you want to launch an isolate you have to call the spawnfunction method and pass the main isolate sender:

var isolate = spawnFunction(bigForCycle);
isolate.send("data", port.toSendPort());

After that you can operate with your isolate in this way for example:

void bigForCycle(){
 
 port.receive((data, SendPort replyTo){
 var count;
 for(var i = 0; i < FINAL_AMOUNT; i++){
   count = i;
 }
 replyTo.send(count);
});

}

It’s finally important remember to close isolates after received the message so when they have finished to accomplish own function, to do that you have only to call the close method in the main isolate and it will not receive any other information from other isolates.
In my example I launched 2 isolates to accomplish the task, so I created a counter variables to store how many reply the main isolate received, after received all replies I can close the communication with other isolates:

port.receive((data, SendPort replyTo){
 
 counterIsolate++;
 end = new DateTime.now();
 
 if(counterIsolate == 2){
 var finalTime = end.difference(start).toString();
 myH1.appendHtml("isolate total time: <b>$finalTime</b><br/>");
 // if you want to close isolates you have to use the line below
 port.close();
 
 }

 });

The most interesting thing is that you can accomplish the same task in 2 different way, the first one, as I did in my example, with inline isolates and the second one is loading code dinamically from external Dart files.
To take a look to the second one I suggest to read this post made by Seth Ladd.

Isolate technique is very useful also when you are working on a serverside project with Dart because it could optimize some intensive process that you have to achieve during your project.

I’ve just opened a github repository with all Dart examples that I’m working on, so feel free to check out at this link.
Enjoy!

Tizen the new mobile OS

Yesterday Tizen conference finished with a lot of great things announced, so in this post I’d like to recap the main news that I’ve catch during this conference.
First of all Tizen is an open source operating system, not only for mobile purpose but also for TVs and automotive market too.
Behind Tizen there are many players but the most interesting are Samsung, of course, and Intel.
Actually Samsung is working on the new version of Tizen, the 3.0, but they have just released the 2.1 that allow any web developer, C++ developer or Unity developer to deliver content on this new OS.
The first devices will be shipped this summer (more or less), in Europe the first operator that believe in Tizen will be Orange, in Asia otherwise will be NTT DoCoMo.
Web development APIs on Tizen are hardware accelereted, so the performance should be incredible, actually if you want to start work with Tizen is quite easy, first of all you have to download the SDK, then inside the SDK you can find the TizenIDE that allow you to create Web Application or Native Application, debug them and prepare for the store.
This IDE is really well done in fact you can debug your application in a simulator (quite similar to the last introduced in Flash CS6 or Device Central for example), directly on the device trough USB, or in the emulator; the simulator and emulator are inside the free SDK that you can download directly from Tizen website.
Web Applications, at this moment, run in Tizen Web Runtime not with Phonegap or other frameworks but Apache Cordova is working to support Tizen export soon and they would like to add on Phonegap buid solution made by Adobe.
Tizen is based on webkit and it’s the most compliant platform at the moment with a score of 492/500.

Another great thing of Tizen is that Samsung created a real platform around it, in fact for the native side you can also create and skin your GUI directly with Tizen UI Builder, a software similar to Apple Interface Builder and it helps a lot during the creation and definition of UI.

I followed a couple of session dedicated on how to port PhoneGap application on Tizen and it’s interesting to know that the porting is so smooth (less than a week for many games).
The Web Runtime APIs for Tizen are very powerful, they allow to work with Bluetooth, NFC and many others low-level features in a really easy way.

At the end of the event any attendee received a device for testing purpose, so after dinner I started to play with Tizen and the Web Runtime, mainly to understand if there are many differences between a Tizen app and a Phonegap one.
As you can see in few time I create an example that works on Tizen with HTML5, Jquery Mobile and Underscore.js

The first impression is positive, everything works well, I didn’t find any kind of problems, the documentation is well done and you can find a lot of resources directly on developers website.
I didn’t try yet to work with platform APIs but I see on the documentation that are quite similar to Phonegap so I don’t think that a Phonegap developer could have any problems to work with them.

Last but not least, Samsung has created an app challenge that will start at the beginning of June where you can win a lot of money so if you want to partecipate take a look at the challenge website.

Finally, Tizen is going in the right direction for me, the big deal will be the penetration on the mature markets, if many people all over the world will start to buy it and use it, probably it should become so interesting, but for now we have to wait the launch of the devices.