This morning during my commuting time I read a post on Lit-HTML and this templating library intrigued me at the level that I needed to experiment as soon as possible, so I took a night off because I was curious to see this new approach in action.
DISCLAIMER: If you are an expert on Lit-HTML I beg you pardon if I didn’t report all the latest on lit or some information in this post are not up to date 😅 but if you are a curious like me 🤠, you may have found the right place understand what Lit-HTML is and why I was excited to try it 😇.
What is Lit-HTML?
Lit-HTML is a blazing fast template library that will be used for the new version of Polymer (v 3.0), it was presented during last Chrome Dev Summitin San Francisco and I warmly suggest to invest ~30 mins of your time watching the following talk for getting an idea of the library:
If you don’t have 30 mins right now here a summary of what lit-HTML is doing.
Lit-HTML doesn’t use Virtual DOM like the latest trends in many UI libraries like React or Preact for instance, but instead is using web standards to generate and update a UI component.
In fact, this library uses the <template>tag and ES2015 tagged template literals for generating a DOM node.
With this approach, lit-HTML is capable to analyse the template literals and update only the mutable part maintaining the static bit unchanged increasing the render performance compared to the virtual DOM approach.
To provide an idea of how lit-HTML differs from a VDOM library I created these animations so you can immediately see the work done by one and the other library for updating a DOM node value and an attribute:
with Preact (or React, both behave in the same way):

with lit-HTML:

As you can see, lit-HTML heavily optimise the updates just recalculate what effectively should be re-rendered instead of re-rendering the entire node, this behaviour is highlighted in the first h1 tag of our example: Preact is re-rendering the entire node including the text that is static by design (“Preact” word was static, the number instead is a random one I used for causing a DOM update), instead lit-HTML splits the string in what is static and what is not so it can update ONLY what potentially could change without the need of re-rendering anything else.
If you are wondering what is the black magic behind lit-HTML, I can summarise it in this way: JUST WEB STANDARDS!
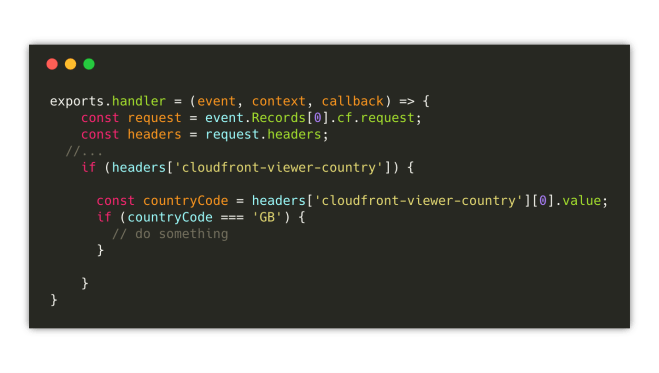
Surprisingly enough, lit is not using anything too complicated but just web standards, when we define a template to render with lit-HTML we write a component like that:
As you can see it’s just a function returning a tagged template literal, the tag correspond to the word html provided by lit-html library.
Tags in templates literals have the characteristic to manipulate the template before being returned, in fact the tag is usually a function that is intercepting the output of a template literal before being returned.
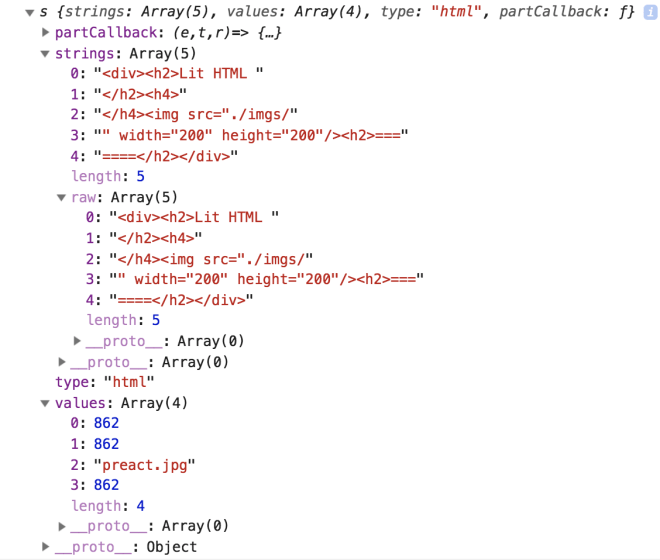
The html tag, provided by lit library, is analysing the template before returning it to the render function used for updating the DOM, if we output on console how our template becomes before being rendered, we can see that the html tag is performing an analysis for dividing what is static, what is dynamic and creates an array of raw data:
For benchmarking lit-HTML, I created a simple test with some random HTML elements updated every 500ms.

Looking at the performances, the node values or attributes update or the subtree update inside a template is incredibly fast compare to the VDOM approach.
This is noticeable also with not nested components like the ones above, I run several tests on them and this is the outcome:

These data are reporting how long did take on the average of several DOM updates.
We can see in the image below that sometimes Lit-HTML was even faster than the values inside the table and sometimes a bit slower, but comparing with Preact (and also React because I tried both), Lit-HTML is really consistent time wise, the discrepancy between an update and the other is really small.
Lit-HTML is definitely loosing against Preact or React on the first time render, in fact I noticed that Lit-HTML is on the average 60–70% slower just for the first few renders, after that is blazing fast compared to the VDOM one.
Also, after 10-15 mins of keeping the test up and running, I noticed the 2 components weren’t on sync anymore and apparently the Preact one was a tick behind the lit-HTML one.

It’s worth mentioning how I was able to retrieve these values so you can try your own tests as well if you like.
After creating a Preact and a Lit-HTML component, I used the performance APIs in the following way:
- Before returning the html to render I added the starting mark with the following code:
performance.mark('litStarts’)orperformance.mark('reactStarts’) - Then, using the MutationObserver object I observed every change to
characterData, childList or subtreecalculating the time it took to update the DOM with the final mark andmeasuremethod from performance APIs:
Let’s observe now how a lit-HTML component is created, the 2 essential parts are the html tag used or analysing the template literal and the render method used for updating the DOM, this is a simple lit component:

The render method has to be called every time there is a template update, in order to do that we can create our own logic via setInterval or requestAnimationFrame or any other way will trigger the render method after changing a value inside the template (proxy or reactive programming could be other 2 interesting methods to try).
A more in depth explanation could be find reading this article: A bit about Lit-html rendering.
Luckily, lit-html is integrated in the next version of Polymer (v3.0) therefore we won’t need to spend much time wrapping this template engine inside custom code for creating our components library.
Bear in mind, as highlighted in the Polymer repo, LitElement is not ready yet for production but we can start experimenting with it.

Considering Lit-HTML is a standalone template library, if you are not comfortable on using polymer you can always create your own components library 🤩🤟 and integrate it with your favourite state management!
Other online resources
Before finishing this quick article, I thought would be useful sharing additional resources for understanding a bit better lit-HTML, hopefully you will find them useful