Running Webpack on AWS Lambda

AWS Lambda, but more importantly the serverless ecosystem, is changing the way we can create and think our softwares on the cloud.
With serverless we can really focus on coding our service more than worrying about the infrastructure. Serverless is not useful in any occasion but there is a wide range of situation where using it becomes handy and very powerful.

For instance, let’s think for a moment our automation build pipeline: what would you say if I can tell you that you won’t need to tight them with a specific tool like Jenkins or Bamboo but you should use Jenkins or similar as luncher running multiple Lambda functions, in parallel or in sequence, levering the power of the cloud?

I can give you a concrete example, yesterday night I was doing a spike in order to generate a Javascript bundle on the cloud with Webpack.
Therefore I invested some time creating an AWS Lambda that executes Webpack for bundling a simple example that contains lodash and some ES6 code like this one:

import _ from ‘lodash’;
function component () {
       var element = document.createElement(‘div’);
       element.innerHTML = _.join([‘Hello’,’webpack’], ‘ ‘);
       return element;
}
document.body.appendChild(component());

This is an example that you can find in the webpack official website, I used that just for the sake of the demo.
What we want to do now is the possibility to bundle this ES6 code and its library to a unique Javascript file that could be used inside our hypothetic application or website, mimicking what a step of a build pipeline would do.
Obviously you could run any other executables inside AWS Lambda, I choose Webpack because was the one used in my working place.

AWS Lambda at the rescue

If you create an automation pipeline on the cloud and maybe you don’t have many devops in your team or company, you should spend some time learning AWS Lambda, it could help out in these kind of activities.

What is AWS Lambda? Long story short: it’s a stateless docker container that is maintained by AWS where you can focus on writing the business logic of your activity more than thinking on the infrastructure.
Too good for being true? Yeah, you are right, Lambda has some limitations:

Information retrieved from Amazon documentation in March 2017

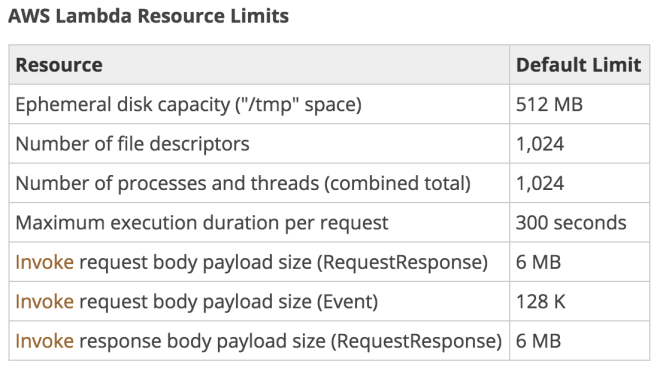
More information regarding the limits are available in the Lambda documentation website

But still the amount of things you can do with it is pretty impressive!

So, going back to our main goal, we want to bundle our Javascript project with Webpack inside Lambda, how can we achieve that?

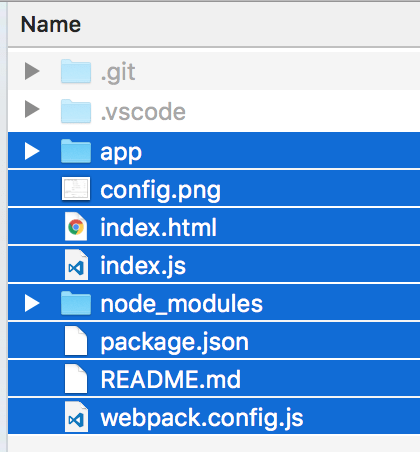
First thing first, I created a git repository where you can find a Javascript project to simply use inside a AWS Lambda function. In this way you won’t need to create a custom project and you can focus more on the AWS side.
There are few points that I’d like to highlight in this simple project because usually are the ones that you can waste your time:

  1. Lambda functions can save temporary files inside the /tmp/ folder (bear in mind that you are running your code inside a docker container!).
    If you try to save somewhere else you will receive an error trying executing it.
  2. With Lambda you can run executables or node CLI tools like NPM or Webpack just uploading them inside your Lambda environment and referring to them with relative path.
  3. AWS Lambda runs for not more than 300 seconds therefore if you have a complex operation you could split it up in different chained Lambda functions that are triggered in sequence.
    This should help you in debugging your operations too.

In the project I set up the webpack config file in this way:

var path = require('path');
module.exports = {
   entry: './app/index.js',
   output: {
      filename: 'bundle.js',
      path: path.resolve('/tmp/')
   }
};

As you can see I’m saving my bundle in the tmp folder because is the only one with write permissions (remember the capacity limit of 512MB for that folder).

Then I created an index.js file where I describe my Lambda function:

var spawn = require('child_process').spawn;
var fs = require('fs');


exports.handler = (event, context, callback) => {
   var wp = spawn('./node_modules/.bin/webpack', ['--config', 'webpack.config.js']);

   wp.stdout.on('data', function(data){
     console.log('stdout: ' + data);
   });

   wp.stderr.on('data', function(err){
     context.fail("writeFile failed: " + err);
   });


   wp.on('close', (code) => {
     fs.readFile('/tmp/bundle.js', 'utf8', function (err, data) {
         if (err) context.fail("read file failed: " + err);
         context.succeed(data);
     });
   });
};

Very simple code here, I’m using Node, as you can see, but potentially you could use Python or Java (these 3 languages are supported by AWS Lambda at the moment), up to you peeking your favourite.
I import the spawn method in order to run webpack and once it has finished I read the content inside the Javascript bundle file created by Webpack in the tmp folder and I return it via context.succeed method.
Context is an object, always available inside a Lambda function, that will allow you to interact with Lambda for retrieving some useful information or, like in this case, to define when the function succeed or failed.

Now we are ready to upload the application in an AWS Lambda function.
In order to do that you will need to zip your project files (not the parent folder but just the files) and upload then in AWS.
If you didn’t install the project dependencies after cloning the repository, you should do it before uploading it to AWS.

Select and compress only the files inside your project not the parent folder 

Inside your AWS console, after selecting Lambda service, you should be able to create a new function (as far as I know not all the regions are supporting AWS Lambda).
Choose your favorite language, in my case Node 4.3, and define the basic information like “function name”, “description” and so on.
Then instead of writing the Lambda function code inside the editor provided by AWS, open the dropdown and select Upload a ZIP file

Select upload a ZIP file

Then setup the handler, role and advanced settings in this way

it’s important set at least 30 seconds as Timeout period

The important part will be setting up the docker container where the Lambda is going to be executed with enough memory size and with a decent timeout because we are running an executable therefore we don’t want to block the execution due to a Lambda timeout.
If for any reason, you need to increase the 300 seconds soft limit set by default, you will need to contact Amazon and ask to increase it.
Another important information to remember is when the Lambda is not active for a certain amount of time (it’s estimated to 5 mins), the container used by your code will be re-used for other Lambda functions.
Therefore when you will trigger your function again it will be recreated (cold Lambda), instead if the Lambda function runs several times in few mins (warm Lambda) we will have better performances because the container will be already available and live to execute a new activity again.

Now if you want to test your Lambda function, you will need to click the button test and you should have an output similar to this one:

you can see easily the output produced by this Lambda function that is the content inside the Javascript bundle created by Webpack

If you want to test live the Lambda I created you can trigger it from this link

Where to go from here

Obviously the example described is very basic and it works mainly with the project I created, but it is useful to know also how you could expand this example:

  1. AWS Lambda functions accept arguments passed when we trigger them, therefore potentially you could upload your project files in S3 and trigger the Lambda function directly after the upload.
    In fact Lambda can be triggered by several cloud software in AWS like DynamoDB, SNS and so on; S3 is present in the list.
  2. In order to expose the Lambda externally you will need to connect it via API Gateway, another tool provided by AWS.
    In the example I shared above I configured API Gateway to trigger my Lambda function when someone is calling a specific URL.
  3. The fastest way, and my personal recommendation, to work with AWS Lambda is via a CLI tool like Serverless Framework, you won’t need to configure manually API Gateway and your Lambda environment because Serverless Framework will provide a boilerplate to work with.
    On top of that it will allow you to test your Lambda functions locally without uploading them every time on AWS.
    There are many other CLI tools available but at the moment Serverless is the most complete and documented with a large community behind it.
  4. Recently Amazon added the possibility to set environment variables for Lambda functions, therefore if your project requires them you will have the possibility to configure easily via AWS console or inside Serverless framework configuration file.
  5. If you don’t want to upload a CLI tool with the node_modules folder, you can create an executable with all static dependencies and upload just that file inside the ZIP file.
    For Node I found a tool that works pretty well with Webpack and NPM called EncloseJS.
  6. Remember to not abuse the power of the serverless ecosystem but understand the pros and the cons before starting using it because in some cases it’s definitely not the right choice
  7. An important consideration of the combination API Gateway + Lambda is that could work with HTTP2 protocol out of the box and you can use Cloudfront to cache your responses (also if they are dynamic) with just few configurations to set in the API Gateway console.
  8. With Lambda you pay just what you use, therefore if you use it for cron services, automation pipelines, triggering databse backup operations or similar, you could end up savings quite few dollars compare to an EC2 instance.
Advertisement

Hapi.js and MongoDB

During the Fullstack conference I saw a small project made with Hapi.js during a talk, so I decided to invest some time working with Hapi.js in order to investigate how easy it was create a Node.js application with this framework.

I’ve to admit, this is a framework really well done, with a plugin system that give you a lot of flexibility when you are creating your server side applications and with a decent community that provides a lot of useful information and plugins in order to speed up the projects development.

When I started to read the only book available on this framework I was impressed about the simplicity, the consideration behind the framework but more important I was impressed where Hapi.js was used for the first time.
The first enterprise app made with this framework was released during Black Friday on Walmart ecommerce. The results were amazing!
In fact one of the main contributor of this open source framework is Walmart labs, that means a big organisation with real problems to solve; definitely a good starting point!

Express vs Hapi.js

If you are asking why not express, I can reply with few arguments:

  • express is a super light and general purpose framework that works perfectly for small – medium size application.
  • hapi.js was built on top of express at the beginning but then they move away in order to create something more solid and with more built in functionalities, a framework should speed up your productivity and not giving you a structure to follow.
  • express is code base instead hapi.js is configuration base (with a lot of flexibility of course)
  • express uses middleware, hapi.js uses plugins
  • hapi.js is built with testing and security in mind!

Hapi.js

Let’s start saying working with this framework is incredibly easy when you understand the few concepts you need to know in order to create a Node project.

I created a sample project where I’ve integrated a mongo database, exposing few end points in order to add a new document inside a mongo collection, update a specific document, retrieve all documents available inside the database and  retrieving all the details of a selected document.

Inside the git repo you can find also the front end code (books.html in the project root) in Vanilla Javascript, mainly because if you are passionate about React or Angular or any other front end library, you’ll be able to understand the integration without any particular framework knowledge.

What I’m going to describe now will be how I’ve structured the server side code with Hapi.js.

In order to create a server in Hapi.js you just need few lines of code:

let server = new Hapi.Server();
server.connection();
server.start((err) => console.log('Server started at:', server.info.uri));

As you can see in the example (src/index.js) I’ve created the server in the first few lines after the require statements and I started the server (server.start) after the registration of the mongoDB plugin, but one step per time.

After creating the server object, I’ve defined my routes with server.route method.
The route method will allow you to set just 1 route with an object or several routes creating an array of objects.
Each route should contain the method parameter where you’ll define the method to reach the path, you can also set a wildcard (*) so any method will be accepted in order to retrieve that path.
Obviously then you have to set the route path, bear in mind you have to start always with slash (/) in order to define correctly the path.
The path accepts also variables inside curly brackets as you can see in the last route of my example: path: ‘/bookdetails/{id}’.

Last but not least you need to define what’s going to happen when a client is requesting that particular path specifying the handler property.
Handler expects a function with 2 parameters: request and reply.

This is a basic route implementation:

{
   method: 'GET',
   path: '/allbooks',
   handler: (request, reply) => { ... }
}

When you structure a real application, and not an example like this one, you can wrap the handler property inside the config property.
Config accepts an object that will become your controller for that route.
So as you can see it’s really up to you pick up the right design solution for your project, it could be inline because it’s a small project or a PoC rather than an external module because you have a large project where you want to structure properly your code in a MVC fashion way (we’ll see that in next blog post ;-)).
In my example I created the config property also because you can then use an awesome library called JOI in order to validate the data received from the client application.
Validate data with JOI is really simple:

validate: {
   payload: {
      title: Joi.string().required(),
      author: Joi.string().required(),
      pages: Joi.number().required(),
      category: Joi.string().required()
   }
}

In my example for instance I checked if I receive the correct amount of arguments (required()) and in the right format (string() or number()).

MongoDB plugin

Now that we have understood how to create a simple server with Hapi.js let’s go in deep on the Hapi.js plugin system, the most important part of this framework.
You can find several plugins created by the community, and on the official website you can find also a tutorial that explains step by step how to create a custom plugin for hapi.js.

In my example I used the hapi-mongodb plugin that allows me to connect a mongo database with my node.js application.
If you are more familiar with mongoose you can always use the mongoose plugin for Hapi.js.
One important thing to bear in mind of an Hapi.js plugin is that when it’s registered will be accessible from any handler method via request.server.plugins, so it’s injected automatically from the framework in order to facilitate the development flow.
So the first thing to do in order to use our mongodb plugin on our application is register it:

server.register({
   register: MongoDB,
   options: DBConfig.opts
}, (err) => {
   if (err) {
      console.error(err);
      throw err;
   }

   server.start((err) => console.log('Server started at:', server.info.uri));
});

As you can see I need just to specify which plugin I want to use in the register method and its configuration.
This is an example of the configuration you need to specify in order to connect your MongoDB instance with the application:

module.exports = {
   opts: {
      "url": "mongodb://username:password@id.mongolab.com:port/collection-name",       
      "settings": {          
         "db": {             
            "native_parser": false         
         }
      }    
   }
}

In my case the configuration is an external object where I specified the mongo database URL and the settings.
If you want a quick and free solution to use mongoDB on the cloud I can suggest mongolab, when you register you’ll have 500mb of data for free per account, so for testing purpose is really the perfect cloud service!
Last but not least, when the plugin registration happened I can start my server.

When I need to use your plugin inside any handler function I’ll be able to retrieve my plugin in this way:

var db = request.server.plugins['hapi-mongodb'].db;

In my sample application, I was able to create few cases: add a new document (addbook route), retrieve all the books (allbooks route) and the details of a specific book (bookdetails route).

Screen Shot 2015-12-04 at 23.44.38

If you want to update a record in mongo, remember to use update method over insert method, because, if correctly handled, update method will check inside your database if there are any other occurrences and if there is one it will update that occurrence otherwise it will create a new document inside the mongo collection.
Below an extract of this technique, where you specify in the first object the key for searching an item, then the object to replace with and last object you need to add is an object with upsert set to true (by default is false) that will allow you to create the new document if it doesn’t exist in your collection:

db.collection('books').updateOne({"title": request.payload.title}, dbDoc, {upsert: true}, (err, result) => {
    if(err) return reply(Boom.internal('Internal MongoDB error', err));
    return reply(result);
});

SAMPLE PROJECT GITHUB REPOSITORY

Resources

If you are interested to go more in deep about Hapi.js, I’d suggest to take a look to the official website or to the book currently available.
An interesting news is that there are other few books that will be published soon regarding Hapi.js:

that usually means Hapi js is getting adopt from several companies and developers and definitely it’s a good sign for the health of the framework.

Wrap up

In this post I shared with you a quick introduction to Hapi.js framework and his peculiarities.
If you’ve enjoyed please let me know what you would interested on so I’ll be able to prepare other posts with the topics you prefer.
Probably the next one will be on the different template systems (handlebars, react…) or about universal application (or isomorphic application as you prefer to call them) or a test drive of few plugins to use in Hapi.js web applications.

Anyway I’ll wait for your input as well 😀