The Micro-Frontends future

Photo by Randy Tarampi on Unsplash

Between the end of 2021 and the early weeks of 2022, I spent some time looking at where the micro-frontends journey is arrived so far.
I analysed the different challenges where teams are struggling with, the anti-patterns that causes coupling in the long term, and what are the recurrent patterns used for solving them.

We discovered that micro-frontends enabled teams to work independently and contribute to medium-large size applications, iteratively evolving our applications and reducing the blast radio of potential issues.

However, the analysis couldn’t stop on what we have achieved till now.

I had to look forward, a step into the future.

I have to understand what are the missing pieces of this fascinating puzzle and try to picture what would make this architecture approach even better.

In this post, I want to share a bunch of ideas and trends that might spark some interesting conversations in the micro-frontends community.
The topics covered are taking into account the client-side, server-side and edge-side implementations of this architecture.

Finally, I am going to share what will be my focus for 2022 to the micro-frontends ecosystem.

More upfront design

One of the main challenges for micro-frontend architectures is answering the question: how “micro” is a micro-frontend?
This is a question many organizations are facing, and in the reality, there isn’t only one answer, we need to understand the context, the organization structure and its size, and the communication flow between team.
After several engagements with multiple teams working on distributed architectures, I’ve seen many times “distributed components” more than a micro-frontends implementation.
With distributed components, the domain knowledge was shared across the container and the “micro-frontend” or even between the container and multiple “micro-frontends”.
We are still struggling to find the right boundaries and there is sometimes a lack of understanding of how we should interpret micro-frontends when we implement them.
I think this understanding is a necessary step towards better maturity, mastering the application business subdomains is not an easy task and requires a deep knowledge of the application we are building.

However, I think there is a potential solution for mitigate this challenge.

Investing more time upfront on the whiteboard revising with multiple parts of the organization how split our business domains without compromising the user experience is a must.
When we walk out from these meetings, we should be have enough ground covered to kick off the project with confidence and review our decisions on a regular cadence to make sure our initial assumptions are still valid for reaching our goals.
Remember that we cannot capture everything upfront, a business and an organization today is likely to change in 6 or 12 months so we should revisit our micro-frontends boundaries on a regular basis.

Also, never forget the link between organization structure and software architecture, it’s important to be aware of it and take it into account in our design decisions.

Micro-frontends communication

When we have multiple micro-frontends in the same view, at some point they need to communicate with each others.

In the mental model I created for designing micro-frontends, it’s encouraged to communicate between micro-frontends using a publish-subscribe pattern for enforcing the boundaries between micro-frontends, avoid or at least reduce the design-time coupling that leads to more autonomous teams.

For implementing technically this pattern there are several options such as Custom Events, an event emitter library, or even reactive streams.

An important requirement came up in the last few months that I didn’t put too much emphasis at the beginning, probably because I gave it for granted, but it’s definitely something to be aware of.
Like for event-driven architectures on the backend, having a clear schema for an event will help to avoid mistakes during the integration phase. Moreover, a schema provides a clear understanding of what’s going on inside a specific application also for tech people who are not working on the codebase directly.

I discovered in one of the many Slack channels I follow, this event-bus library that definitely helps achieve a more structured communication between loosely coupled elements (micro-frontends but not only): https://www.npmjs.com/package/@trutoo/event-bus

@trutoo/event-bus for your micro-frontends communication

Considering micro-frontends is a distributed architecture, there is the need to have a more formal API or events management.
API or events are the way how teams interact, not only in micro-frontends.
It’s essential to understand that these practices are not helping only a developer to avoid mistakes when an event is sent but also facilitate the discussion between teams and provide clarity of intent.
I hope in the future there will be even more effort in simplifying the developer’s experience when we have large applications that are massively using loosely coupled communications strategies.
How nice would be having an event registry to consult every time we are developing new interactions between micro-frontends?

Finally, if you didn’t have a chance to see what PayPal is doing on micro-frontends communication, I highly encourage you to watch this great video!

https://lucamezzalira.wordpress.com/media/8ab1607c97e5b8f5865c7a8b340318faPayPal presentation during the Micro-Frontends Conference organized by hasgeek

Server-side rendering (SSR)

Server-side rendering architectures are the ones who are innovating more in the past few months, think about Next.js or the investment made by the team behind React 18 with server components.
We have some interesting solutions also on micro-frontends like module federation for Next.js, Piral, TailorX, ILC and many others.

For SSR micro-frontends applications there are quite a few topics we should start to look at more in depth.
These are the gaps I’ve individuated so far:

  • micro-frontends discovery: like the service discovery pattern for microservices but applied to the frontend. Using this pattern we could compose micro-frontends dynamically without any static reference to an endpoint in a system.
    Imagine a micro-frontends infrastructure self-registering to a discovery service and a UI composer retrieving micro-frontends from the discovery service instead of being point-to-point with the micro-frontends itself 🤯
  • reference architectures on the cloud: there is a lack of guidance on how to build SSR micro-frontends architectures using popular cloud providers. This is a friction point that can be fixed relatively quickly and I want to help as much as I can.
  • leverage the serverless paradigm with micro-frontends: I believe serverless can provide a great speed of development delegating the infrastructure management to a cloud provider. At the same time, we have to shift our mindset in understanding which services we should leverage for specific workloads like micro-frontends. 
    For instance, I see the value to use a service like AWS Step Functions for simplifying the creation of micro-frontends considering it provides great integration with the entire AWS ecosystem. This allows us to embrace a low-code model that in the long run will simplify the maintenance.
    This is one of the many patterns we can use on the cloud, but exploring these patterns with micro-frontends can be extremely fascinating (at least for me 😅).
  • A framework-agnostic React server components approach: having a mechanism for atomically reloading a portion of a view using SSR when data changes on the backend and seamlessly integrating with client micro-frontends. This will allow a hybrid architecture mixing up CSR and SSR using the right approach for every micro-frontend. Probably we can create such a mechanism today, but having a sleek implementation like in React 18 would be the final goal.

As you can see there are many opportunities in front of us, some more tangible like the reference architecture one, some more longer-term like the agnostic React server components approach.
Of this list, my focus will be on covering the reference architecture as well as the investigation of using the serverless paradigm for micro-frontends. I’ve already started working on the prototype for the reference architecture and I have some interesting prototypes on the serverless side as well. Stay tuned for further updates 😉

Partial hydration

Performance is key for every frontend application, including micro-frontends ones.
It’s been a while since I heard about the concept of “islands architecture, however, I believe in the end this architecture might fall under the micro-frontends umbrella due to its principles and characteristics.
The interesting technique that islands architecture introduces is the possibility to enhance the performance of our server-side rendering applications by leveraging partial hydration.

In a nutshell, instead of hydrating the entire page, only the “islands” visible to the users will be hydrated immediately and the others will be hydrated if/when the user will visualise them.

Partial hydration is not a new technique, it’s available since 2019 (if I remember well), but I didn’t see any reference to this technique in micro-frontends applications. Considering the nature of micro-frontends and how partial hydration works I believe this technique should gain more popularity for optimizing further our SSR micro-frontend applications.

In this post, Addy Osmani provides useful resources for understanding better the concept:

https://lucamezzalira.wordpress.com/media/05183d9218e2178a406d66ba817ac427Partial Hydration resources

Finally, if you are interested in this topic, I encourage you to have a read this post where there is a list of UI frameworks that might use partial hydration.
I’m currently experimenting with Preact in a micro-frontends proof of concept, hopefully, I’ll be able to share more insights soon.

Micro-frontends and edge computing

When we talk about micro-frontends at the edge, we often think about Edge-Side Includes (ESI) markup language.
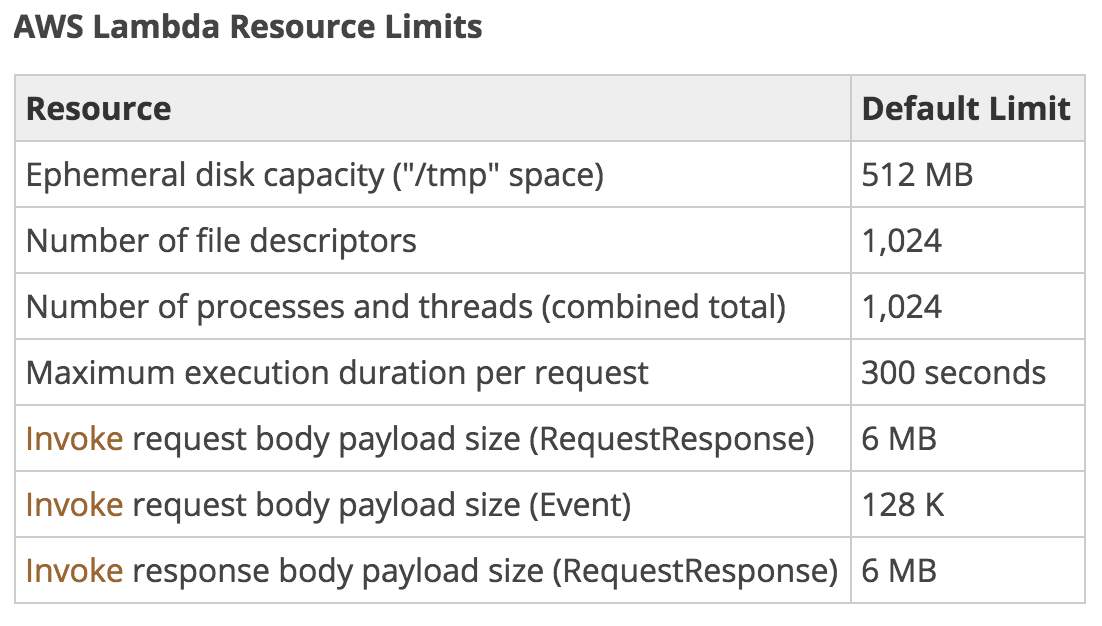
This time I am pointing to the compute capabilities that many CDNs are providing like AWS Lambda at the edge or Cloudflare workers.

The edge technologies are advancing fast and therefore part of applications can be moved towards the edge improving the latency and the scalability of our solutions.
However, in many web applications, we cannot consider only the computational effort to generate an HTML page using multiple micro-frontends but we need to account also the complexity of the entire application.

Computation is often the “easiest” problem to solve nowadays, less so when it comes to data gravity (database, multi-region data replication, writes vs reads with global infrastructure, data replication latency…), or authentication that usually is centralised and well secured in a specific region of your cloud infrastructure or even a data centre on-prem.

It’s true, SSR micro-frontends applications can benefit from edge computing but they require access to a multitude of other resources (data, authentication, caches…) that are not fully available on the edge yet.
We cannot really think to use the full power of the edge unless we have a workload very well encapsulated that doesn’t require any of these external dependencies.

I believe we will end up having a larger adoption of edge technologies in the future, but at the same time I think we have to understand better where edge technologies can be used with a real impact on our workloads and not just because is “cool” (hype-driven development anyone?) working with edge nodes.

In my opinion, edge computing will have great relevance for micro-frontends in the near future, especially for improving the applications’ performance, but it’s not as simple as it seems right now.

Deployment

In microservices, there are a set of consolidated practices for de-risking the deployment of new microservices versions like feature flags, blue-green deployment and canary releases.
In the past 12 months I didn’t see any effort for implementing similar practices with micro-frontends, a part from feature flags that look a well-known pattern for many teams.
I believe a deployment strategy that creates confidence in the development team is a must-have.
In a distributed system, where often continuous deployment is a reality, we have to create a safety net for developers who can iterate fast-moving their code from their laptop to a production environment without risking introducing bugs experienced by all the users in one go.
For SSR micro-frontends we can easily reuse existing tools and practices for releasing our infrastructure leveraging one of these mechanisms, although, those strategies are often not embraced for client-side rendering micro-frontends applications.

There are several ways we can implement them, client-side, server-side or even at the edge.
My recommendation is to implement one of these strategies as soon as possible because they can create a safer environment for your teams and the consequences might surprise you… in positive 😁

Routing

Strictly linked to the deployment strategy, client-side rendering micro-frontends applications are lacking a solid routing strategy.
All the implementations are using the same routing libraries we use to implement monolithic architectures.
Instead, I believe we can do better than this!

When we mix a routing library in conjunction with the deployment strategy described before, we can have a very smart routing that takes into account newer micro-frontends versions, different environments, or even different user roles.
We can also have tools that gradually increase the traffic towards versions and performs rollbacks in the same way.
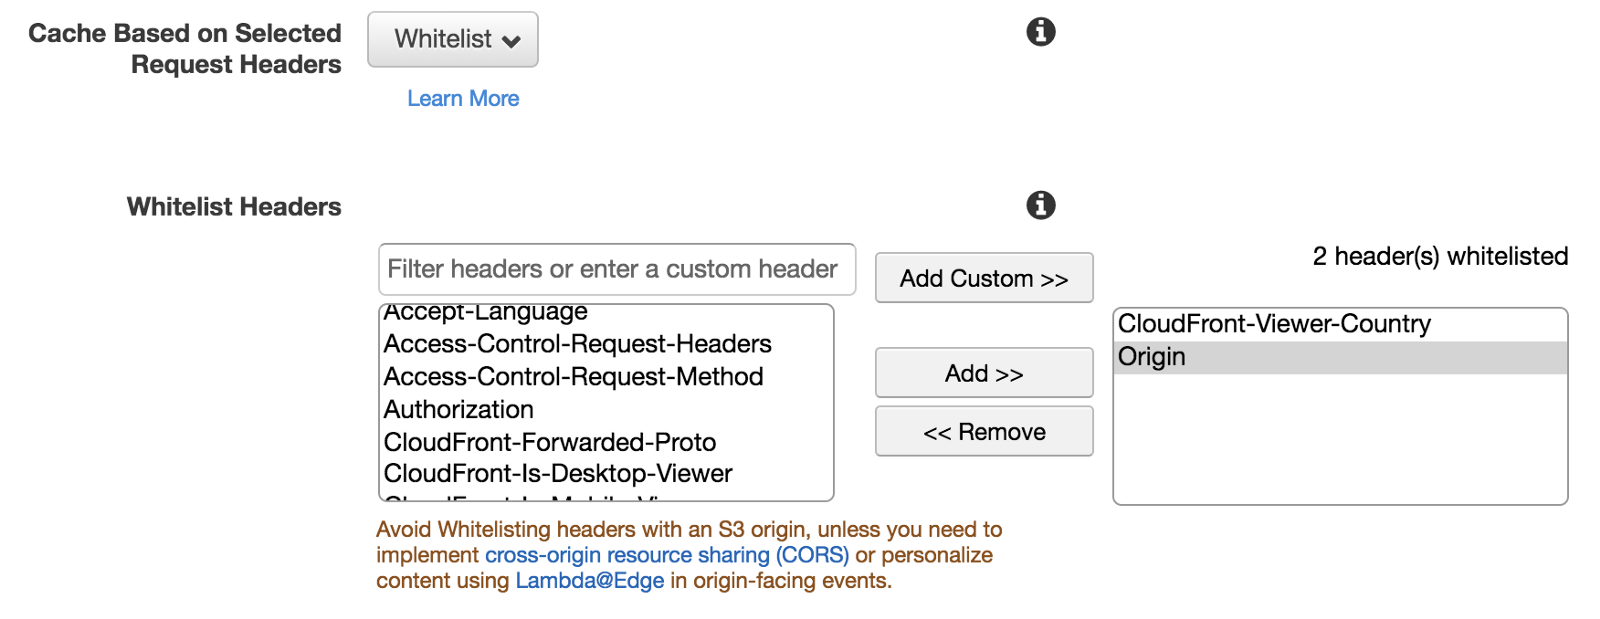
For instance, when we develop containers or serverless workloads in AWS, we can easily set up the deployment strategy we prefer with a few lines of configuration:

Canary Release of an AWS Lambda Function using AWS SAM

The routing in the application shell can be orchestrated easily via an external JSON that provides the different possibilities available without the need of integrating this information into the application logic.
Finally, when this static JSON is combined with deployment logic I believe the combination can bring a lot of value reducing the risk of new versions and allowing dynamic configurations based on any logic your business would like to implement.

The routing and deployment are definitely areas of interest for me. I’ll invest time during the next months to remove the undifferentiated heavy lifting and allow teams to better control their deployments and routing. I hope I’ll be able to share what I’m working on sooner rather than later because the working group is very excited about these two topics 🚀

Micro-frontends management

I didn’t explore (yet) this area, but I have a list of tools to try for understanding the PROs and CONs with micro-frontends.

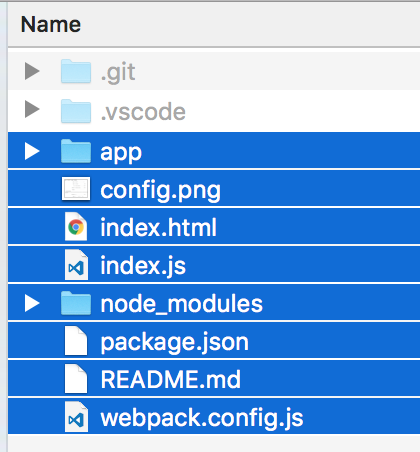
My focus will be mainly on monorepo because I believe with poly-repo we don’t need extra tools for managing code like we have when there are multiple independent projects sitting in the same repository.
Currently, these tools caught my attention:

I believe all of them have some features that might help to structure a monorepo strategy improving the developers’ experience.

It’s a stretch goal for this year, not sure I’ll be able to invest enough time in reviewing every tool but I’ll definitely keep an eye on this space because I believe there are more unexplored opportunities to improve the developer experience even further.
Any suggestion on tools to try is more than welcome, especially if you can provide a brief review of them when you share your experience 😁

Summary

As you can see, there is still a lot of ground to cover in the micro-frontends ecosystem but we made great step forwards in the past years.
This for me it’s a super exciting opportunity to shape many areas of improvement for a “young” architecture that is raising success across enterprise organizations globally.
I’m sure there is more to discover, and I hope this fast adoption will bring new insights into what does and doesn’t work in distributed UIs architectures.
There are other topics on my radar like WebAssembly, better security on the client-side, streamlining even further the developers’ experience and more, but the topics listed in this post should provide food for thought for all the community to improve this novel way to scale our applications and organizations for the next few months.

Geo-routing, A/B testing and dynamic configuration with Lambda@Edge — part 1

Working at the edge is one of the fantastic opportunities offered by Amazon and AWS Lambda is the key component for enhancing our infrastructure on the edge.
More recently many other vendors started to offer similar services like Cloudflare with edge workers for instance, in general many CDNs providers are looking to add a similar service like the AWS one.

Lambda@Edge introduction

Lambda@Edge provides you the possibility to extend the behaviours of a request or response directly on the edge.
This paradigm, in conjunction with the serverless one, can provide a great flexibility in structuring our applications and it can prevent that too many requests hit our application servers executing operations directly on the edge like headers manipulation, access control, redirection rules, images manipulation and so on.
In order to work with Lambda@Edge in AWS we just need to setup a Cloudfront distribution in front of our infrastructure, the Cloudfront distribution will allow us to setup our logic on the edge because we are able to intercept the 4 states of a request and interact with them.
In fact Lambda@Edge can be triggered at:

· viewer request: in this case the lambda is triggered when Cloudfront receives a request from a client
· origin request: the lambda is triggered before Cloudfront forwards the request to origin
· origin response: this state happens after origin replies to a request and Cloudfront receives it
· viewer response: the last state is triggered when Cloudfront forwards the response to the client.

Cloudfront is a global CDN therefore Lambda@Edge is triggered on any edge available across the world.
This means that independently from the region we set our data centre, we can manipulate or serve responses on the edge before they even arrive to our application servers.

I spent some time working on a spike for handling 2 specific features, geo-routing and a/b testing, in the mix I tried also to dynamically retrieve configurations parameters for the Lambda in order to avoid code deployment for every change I needed to do.
I’ll share the results of my spike between 2 posts, this one talks about the initial thoughts, goals and results achieved with Lambda@Edge, the second one will be more technical and I’ll explain how I configure Cloudfront, the Lambda code and setup and the overall setup for interacting with other AWS services on the edge.

Spike goals

Before we start I think is valuable understanding what I wanted to achieve with this spike, the goals are:

1. geo-routing a request to a specific static file stored in S3 bucket based on user country
2. A/B testing different applications serving always maintaining a sticky session per browser so a user always interacts with the same version
3. The previous 2 goals shouldn’t significantly impact the response time, Lambda@Edge has to be executed redirecting the user to the correct static file in 50ms or so
4. “bonus goal” is the possibility to dynamically apply different configurations without redeploying the Lambda code and without impacting too much the response time

Lambda@Edge configuration and limits

All that glitters ain’t gold! Lamba@Edge has several limitations that we need to be aware of before taking it in considerations.
In order to achieve the geo-routing we need to receive from Cloudfront the country viewer header, that will be used to determine where the request is coming from.
This header is received right after Cloudfront forwards the request to origin, we won’t receive at the viewer request state, therefore our Lambda has to be triggered as origin request.
Bear in mind that Cloudfront removes all the headers if not whitelisted for increasing the response cachability, so when we configure our distribution we need to whitelist some specific headers or all of them, depends from our needs.

Lambda@Edge is a particular kind of Lambda with different limitations than the one we are used to work inside an AWS data centre.
First of all the Lambda@Edge has to be created in North Virginia only, we can associate only a numeric released with Cloudfront and not the $latestversion.
When we debug our Lambda@Edge we need to remember that all the logs in Cloudwatch won’t be available in North Virginia only but in the nearest data centre from where the Lambda was executed, for instance I’m based in London therefore during the spike, all the logs on Cloudwatch were available in the London AWS data centre only.
Finally we have also some soft limits to take in consideration like max memory associated to our Lambda@Edge, concurrent executions and so on, you can find them in the image below:

An important thing to remember is how to debug our Lambda@Edge, luckily AWS thought pretty well about this point and they provide a way to simulate an origin request customising the parameters to send it directly from the Lambda console:

Geo-routing

The Geo-routing feature was really easy to achieve considering that Cloudfront provides everything we need out-of-the-box.
After whitelisting the cloudfront-viewer-country header we can receive in our Lambda@Edge the country from where the request was coming from and we can apply the behaviour we need for that specific country.

After configuring Cloudfront distribution properly we can think about describing our behaviour in the Lambda@Edge, in this case I used Node.js for defining the logic:

These are the headers we are going to receive from Cloudfront:

As we can see the implementation is really easy despite the APIs that could have been designed in a more “friendly” way, but I appreciate they are very extensible and flexible allowing the introduction of new features and maintaining retro-compatibility.

A/B testing

For A/B testing the best way to achieve that on the edge is using cookies after select the static file to serve, also in this case we need to configure properly the Cloudfront distribution for forwarding the cookies to the Lambda@Edge:

In this spike for a specific country I was able to redirect a certain percentage of users to a static file and all the others to another one.
This mechanism becomes very handy when we want to test new versions of our web applications, so we can do a canary release and see how the new version behaves compare to the previous one.
Combining A/B testing functionality with the geo-routing feature we can deploy a new artifact in a specific country with a small percentage of users redirected to it, leaving the majority of our users consuming the previous version.
Considering we are using cookies, bear in mind that all the latest version of the browsers allow to store a cookie before doing a redirection but if you are targeting older browsers like IE 10 or similar it’s better to give it a try.
The same concern is valid if you have in your logic multiple redirections in place.

Dynamic Configuration

The bonus feature for the spike was retrieving a configuration for the URLs and the percentage of users we need to redirect on a region basis.
In this case I tried a couple of solutions, the first one with DynamoDB and the second with an S3 bucket where I stored a JSON file.
First of all I need to admit I was surprised that I was able to access a Dynamo table from the edge considering Dynamo is not global like S3 or Cloudfront, so I decided to give it a go.
I structured my table with an ID for each single information I wanted to make dynamic (the URL of an experiment, the percentage of users to redirect to a static file or the other one…) and then I tried 2 approaches, one using scanmethod and the other using get method.
Using scan was slightly slower than using get method but in any case I was over 50ms for Lambda execution therefore DynamoDB wasn’t a viable option for this use case.

I then tried a simple JSON file stored in a S3 bucket, in this case I was able to quickly configure my Lambda retrieving all the parameters I needed for changing URLs or percentage of users redirected to a specific experiment without redeploy the Lambda code.

This could look a small win but you will understand soon that for deploying a new version of a Lambda@Edge we need around 15 minutes before it’s fully propagated across the world.
Retrieving the parameters from an external file allowed to change the key part of the script in a matter of seconds, just the time to make the change in the JSON file and upload on S3.

Considering the operations we usually handle on the edge are very delicates for our infrastructure, having a mechanism to quickly change the behaviour of our logic is fundamental in particular if you are running a B2C service like in my case.

Performances

I didn’t mention in the post any metric because I wanted to gather them in a paragraph for easily compare them, so I created this table related to the executed time in each test I did for achieving the full functionality.
In the table you will see 4 scenarios:
. without any external configuration
. retrieving a JSON file from a S3 bucket
. using DynamoDB with the get method
. using DynamoDB with the scan method

I’d like to add a bit of more context just to make sure you understand how these metrics were retrieved.
DynamoDB was created in North Virginia and the Lambda was running from Europe, I didn’t try yet working with Global Tables but that will be part of a new spike I need to do in the next month, Global Tables could effectively change the execution time of the Lambda but we’ll see.
The execution time for each lambda was gathered from Cloudwatch running each scenario at least 10 times and providing the average you can see in the table.

I leave to you the considerations on the different methods used during the spike.

Useful resources

Following I gathered some useful resources for starting your journey… on the edge

Lambda@Edge limits
Lambda@Edge restrictions
Lambda@Edge pricing
Cloudfront and Lambda@Edge
Routing at the edge tutorial

Wrap up

As we have seen in this post, Lambda@Edge can become very handy for many situations, in particular for alleviating the load of our application servers.
The spike described above is just one of the many possibilities that Lambda provides on the edge, searching on the web you can find interesting tutorials like image manipulations or JWT validation on the edge, this could be just the beginning of a new way to structure our applications providing better performances and easy configurations for our web applications or APIs.
If you are wondering what would be the cost of using Lambda at the edge I leave you with this cost scenario available on the AWS website:

In the next post I’ll present how I set up Cloudfront, S3 and the Lambda code for achieving the goals of my spike, keep an eye on my social accounts 😉

Running Webpack on AWS Lambda

AWS Lambda, but more importantly the serverless ecosystem, is changing the way we can create and think our softwares on the cloud.
With serverless we can really focus on coding our service more than worrying about the infrastructure. Serverless is not useful in any occasion but there is a wide range of situation where using it becomes handy and very powerful.

For instance, let’s think for a moment our automation build pipeline: what would you say if I can tell you that you won’t need to tight them with a specific tool like Jenkins or Bamboo but you should use Jenkins or similar as luncher running multiple Lambda functions, in parallel or in sequence, levering the power of the cloud?

I can give you a concrete example, yesterday night I was doing a spike in order to generate a Javascript bundle on the cloud with Webpack.
Therefore I invested some time creating an AWS Lambda that executes Webpack for bundling a simple example that contains lodash and some ES6 code like this one:

import _ from ‘lodash’;
function component () {
       var element = document.createElement(‘div’);
       element.innerHTML = _.join([‘Hello’,’webpack’], ‘ ‘);
       return element;
}
document.body.appendChild(component());

This is an example that you can find in the webpack official website, I used that just for the sake of the demo.
What we want to do now is the possibility to bundle this ES6 code and its library to a unique Javascript file that could be used inside our hypothetic application or website, mimicking what a step of a build pipeline would do.
Obviously you could run any other executables inside AWS Lambda, I choose Webpack because was the one used in my working place.

AWS Lambda at the rescue

If you create an automation pipeline on the cloud and maybe you don’t have many devops in your team or company, you should spend some time learning AWS Lambda, it could help out in these kind of activities.

What is AWS Lambda? Long story short: it’s a stateless docker container that is maintained by AWS where you can focus on writing the business logic of your activity more than thinking on the infrastructure.
Too good for being true? Yeah, you are right, Lambda has some limitations:

Information retrieved from Amazon documentation in March 2017

More information regarding the limits are available in the Lambda documentation website

But still the amount of things you can do with it is pretty impressive!

So, going back to our main goal, we want to bundle our Javascript project with Webpack inside Lambda, how can we achieve that?

First thing first, I created a git repository where you can find a Javascript project to simply use inside a AWS Lambda function. In this way you won’t need to create a custom project and you can focus more on the AWS side.
There are few points that I’d like to highlight in this simple project because usually are the ones that you can waste your time:

  1. Lambda functions can save temporary files inside the /tmp/ folder (bear in mind that you are running your code inside a docker container!).
    If you try to save somewhere else you will receive an error trying executing it.
  2. With Lambda you can run executables or node CLI tools like NPM or Webpack just uploading them inside your Lambda environment and referring to them with relative path.
  3. AWS Lambda runs for not more than 300 seconds therefore if you have a complex operation you could split it up in different chained Lambda functions that are triggered in sequence.
    This should help you in debugging your operations too.

In the project I set up the webpack config file in this way:

var path = require('path');
module.exports = {
   entry: './app/index.js',
   output: {
      filename: 'bundle.js',
      path: path.resolve('/tmp/')
   }
};

As you can see I’m saving my bundle in the tmp folder because is the only one with write permissions (remember the capacity limit of 512MB for that folder).

Then I created an index.js file where I describe my Lambda function:

var spawn = require('child_process').spawn;
var fs = require('fs');


exports.handler = (event, context, callback) => {
   var wp = spawn('./node_modules/.bin/webpack', ['--config', 'webpack.config.js']);

   wp.stdout.on('data', function(data){
     console.log('stdout: ' + data);
   });

   wp.stderr.on('data', function(err){
     context.fail("writeFile failed: " + err);
   });


   wp.on('close', (code) => {
     fs.readFile('/tmp/bundle.js', 'utf8', function (err, data) {
         if (err) context.fail("read file failed: " + err);
         context.succeed(data);
     });
   });
};

Very simple code here, I’m using Node, as you can see, but potentially you could use Python or Java (these 3 languages are supported by AWS Lambda at the moment), up to you peeking your favourite.
I import the spawn method in order to run webpack and once it has finished I read the content inside the Javascript bundle file created by Webpack in the tmp folder and I return it via context.succeed method.
Context is an object, always available inside a Lambda function, that will allow you to interact with Lambda for retrieving some useful information or, like in this case, to define when the function succeed or failed.

Now we are ready to upload the application in an AWS Lambda function.
In order to do that you will need to zip your project files (not the parent folder but just the files) and upload then in AWS.
If you didn’t install the project dependencies after cloning the repository, you should do it before uploading it to AWS.

Select and compress only the files inside your project not the parent folder 

Inside your AWS console, after selecting Lambda service, you should be able to create a new function (as far as I know not all the regions are supporting AWS Lambda).
Choose your favorite language, in my case Node 4.3, and define the basic information like “function name”, “description” and so on.
Then instead of writing the Lambda function code inside the editor provided by AWS, open the dropdown and select Upload a ZIP file

Select upload a ZIP file

Then setup the handler, role and advanced settings in this way

it’s important set at least 30 seconds as Timeout period

The important part will be setting up the docker container where the Lambda is going to be executed with enough memory size and with a decent timeout because we are running an executable therefore we don’t want to block the execution due to a Lambda timeout.
If for any reason, you need to increase the 300 seconds soft limit set by default, you will need to contact Amazon and ask to increase it.
Another important information to remember is when the Lambda is not active for a certain amount of time (it’s estimated to 5 mins), the container used by your code will be re-used for other Lambda functions.
Therefore when you will trigger your function again it will be recreated (cold Lambda), instead if the Lambda function runs several times in few mins (warm Lambda) we will have better performances because the container will be already available and live to execute a new activity again.

Now if you want to test your Lambda function, you will need to click the button test and you should have an output similar to this one:

you can see easily the output produced by this Lambda function that is the content inside the Javascript bundle created by Webpack

If you want to test live the Lambda I created you can trigger it from this link

Where to go from here

Obviously the example described is very basic and it works mainly with the project I created, but it is useful to know also how you could expand this example:

  1. AWS Lambda functions accept arguments passed when we trigger them, therefore potentially you could upload your project files in S3 and trigger the Lambda function directly after the upload.
    In fact Lambda can be triggered by several cloud software in AWS like DynamoDB, SNS and so on; S3 is present in the list.
  2. In order to expose the Lambda externally you will need to connect it via API Gateway, another tool provided by AWS.
    In the example I shared above I configured API Gateway to trigger my Lambda function when someone is calling a specific URL.
  3. The fastest way, and my personal recommendation, to work with AWS Lambda is via a CLI tool like Serverless Framework, you won’t need to configure manually API Gateway and your Lambda environment because Serverless Framework will provide a boilerplate to work with.
    On top of that it will allow you to test your Lambda functions locally without uploading them every time on AWS.
    There are many other CLI tools available but at the moment Serverless is the most complete and documented with a large community behind it.
  4. Recently Amazon added the possibility to set environment variables for Lambda functions, therefore if your project requires them you will have the possibility to configure easily via AWS console or inside Serverless framework configuration file.
  5. If you don’t want to upload a CLI tool with the node_modules folder, you can create an executable with all static dependencies and upload just that file inside the ZIP file.
    For Node I found a tool that works pretty well with Webpack and NPM called EncloseJS.
  6. Remember to not abuse the power of the serverless ecosystem but understand the pros and the cons before starting using it because in some cases it’s definitely not the right choice
  7. An important consideration of the combination API Gateway + Lambda is that could work with HTTP2 protocol out of the box and you can use Cloudfront to cache your responses (also if they are dynamic) with just few configurations to set in the API Gateway console.
  8. With Lambda you pay just what you use, therefore if you use it for cron services, automation pipelines, triggering databse backup operations or similar, you could end up savings quite few dollars compare to an EC2 instance.